
White Label is finally here!
That means you now have the freedom to present OneSuite as your own, offering clients a completely branded experience. With white-label customization, you can:
- Use your own domain for all client-facing URLs, ensuring seamless access through a professional, branded portal.
- Remove OneSuite’s branding from all client documents, reinforcing your agency’s identity in every interaction.
- Send emails from your own domain, giving your communication a personal and trustworthy touch.
Do you need this?
No… but it’s the key to delivering a more polished and professional experience. White labeling creates the impression that you’re not using an external tool—it feels like your very own platform, tailored to your agency’s brand. Ready to elevate your client experience? Let’s dive into the step-by-step process of setting it all up!
Step 1: Log In to OneSuite and Access White Label Settings
Log in to your OneSuite admin account. From the dashboard, click on Settings from the right-hand sidebar. Inside the settings menu, you’ll find an option labeled White Label. Select it to access the domain connection and customization options.
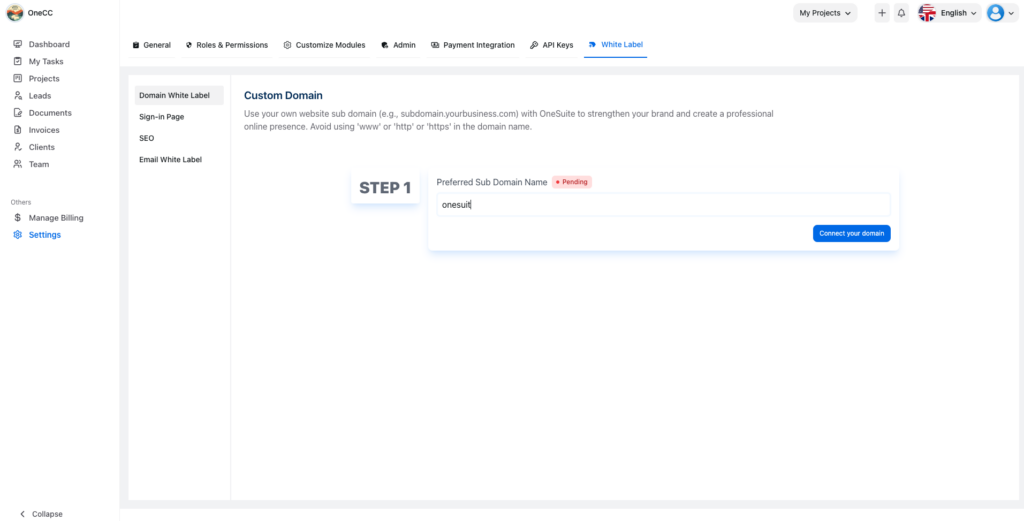
Step 2: Set Up Your Custom Domain
In the Custom Domain tab, enter your preferred subdomain. For example, if your main domain is getonesuite.net, you can use a subdomain like portal.onesuite.us. You’re free to use any subdomain that aligns with your brand, such as client.yourdomain.com. Once you’ve entered the subdomain, click the “Connect Your Domain” button.
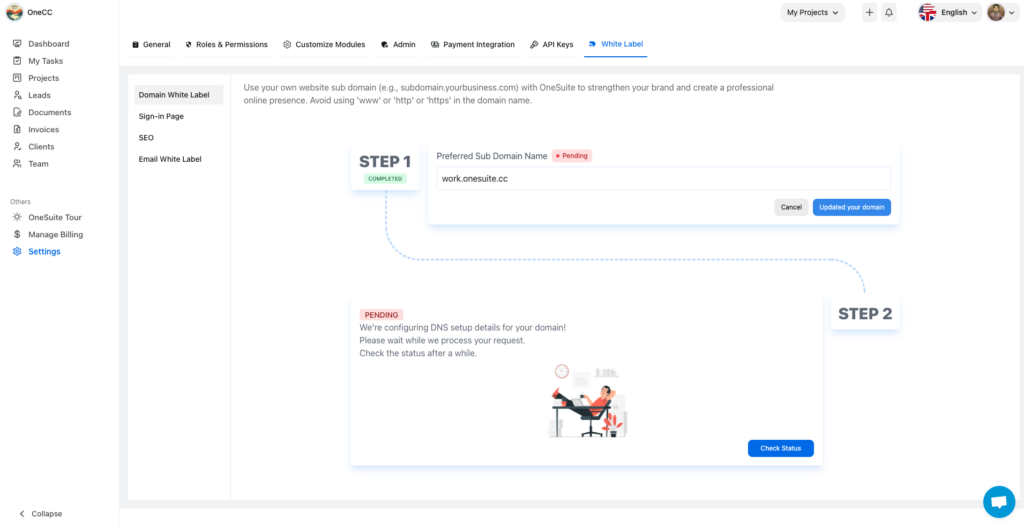
Step 3: Wait for DNS Records to Generate
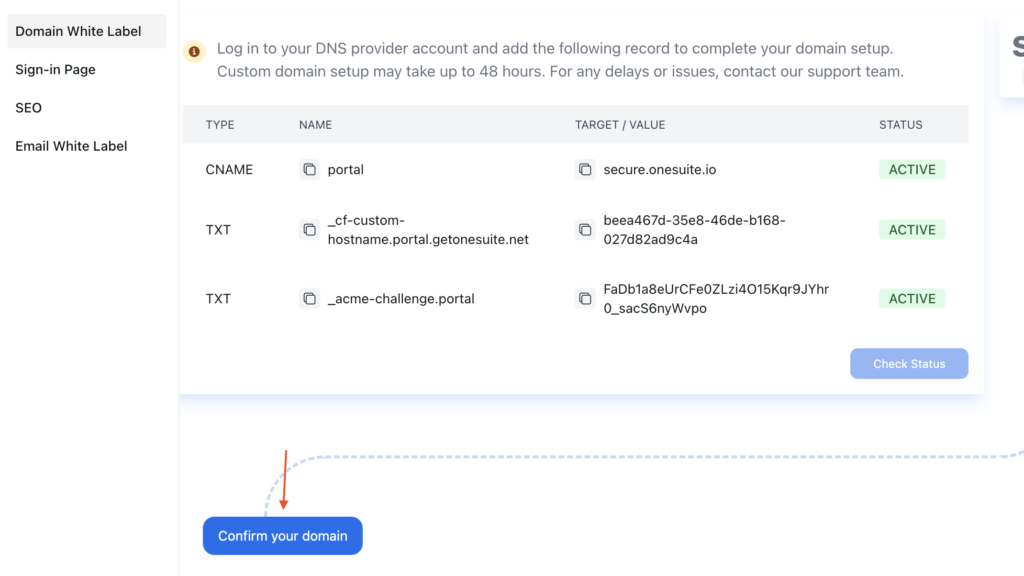
After connecting the domain, the status will initially show as Pending. This happens because OneSuite needs some time to generate the necessary DNS records. Click the Check Status button periodically to see if the records are ready. If they’re not available yet, wait a few minutes and try again. When the records are ready, you’ll receive one CNAME record and two TXT records that need to be added to your domain provider’s DNS settings.
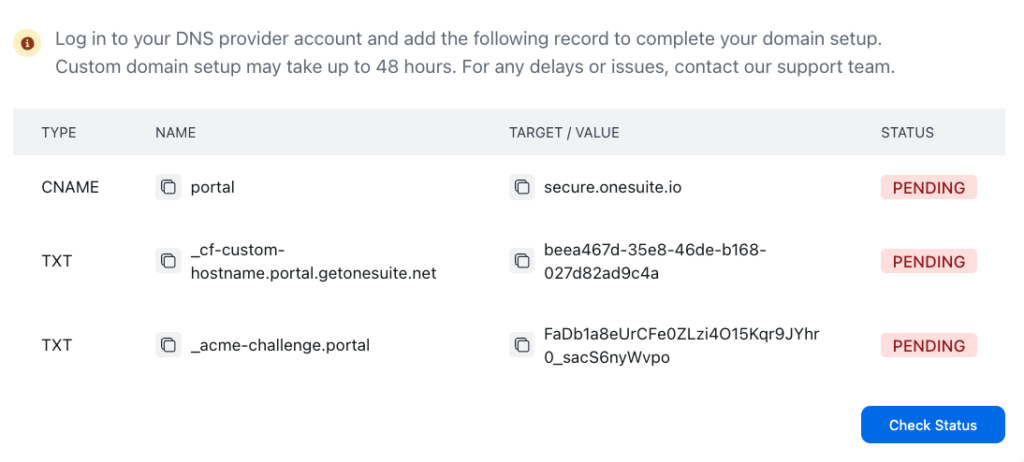
Step 4: Add the DNS Records
Log in to your domain provider’s account. If you’re using a custom nameserver like Cloudflare, access the DNS settings through their platform. For this tutorial, we’ll use Namecheap as an example. Add the CNAME and TXT records exactly as provided by OneSuite to ensure proper configuration. Once you’ve added the records, return to the OneSuite white label settings.
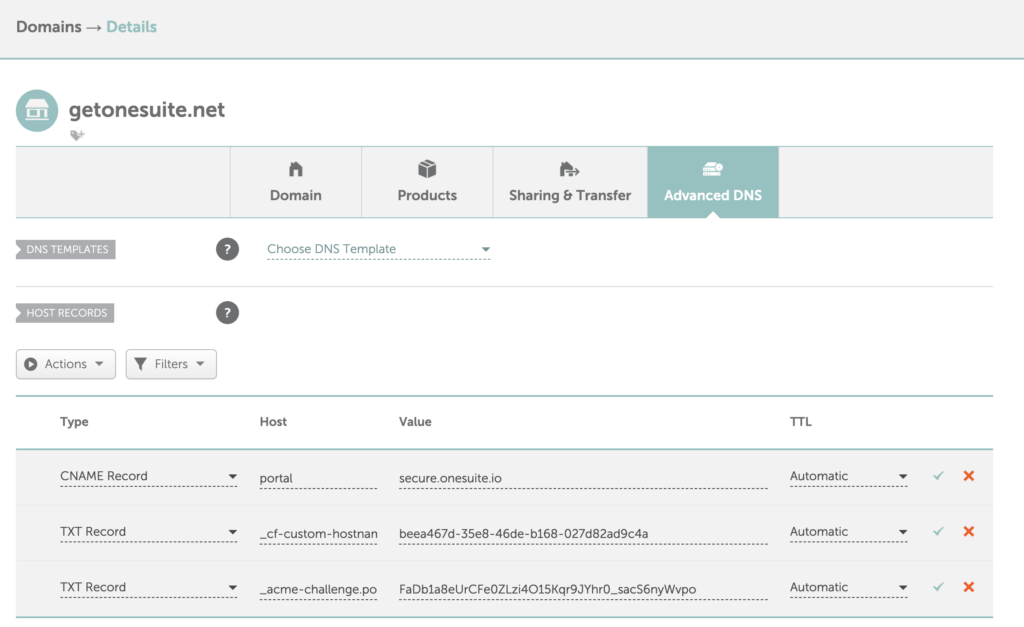
Step 5: Verify Domain Connection
Back in the white label settings of OneSuite, click Check Status again to see if your domain has been successfully connected. It may take up to 48 hours for DNS propagation, although it usually completes in a few minutes. Keep in mind that the third TXT record might take longer to activate. Once all records are active, click Confirm Domain. This will redirect you to the login page of your newly connected custom domain.
Congratulations! Your Domain is Connected
Once all the records are active, the Pending status will change, and you’ll see a confirmation message that your domain is successfully connected. This means your OneSuite portal is now live on your custom domain! You can access the login page through the subdomain you’ve set up—something like portal.yourdomain.com.
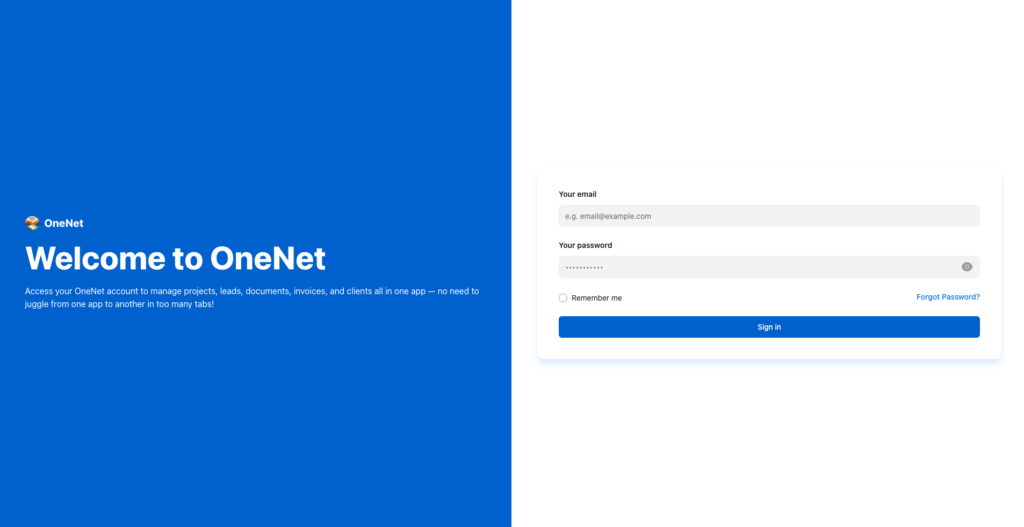
Step 6: Customize Your Brand Look
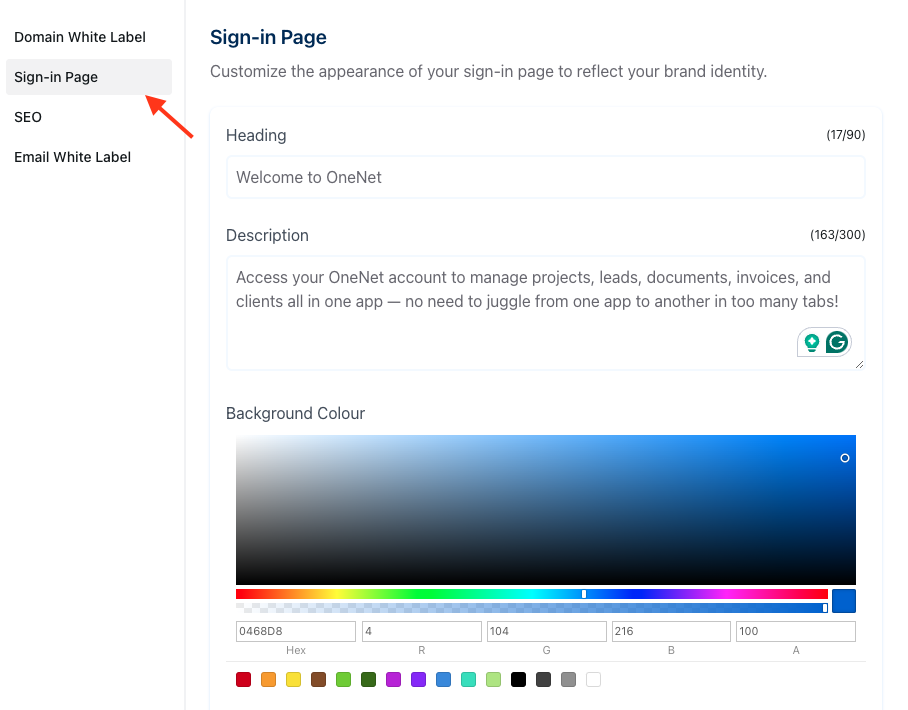
If you’re not happy with the default appearance of the login page, you can update it to reflect your brand’s style. Head back to app.onesuite.io, navigate to White Label Setup, and customize the sign-in page. You can modify the heading, description, background color, and text color to match your brand identity. Make sure to save the changes after you’re satisfied with the look.
Step 7: Configure SEO Metadata
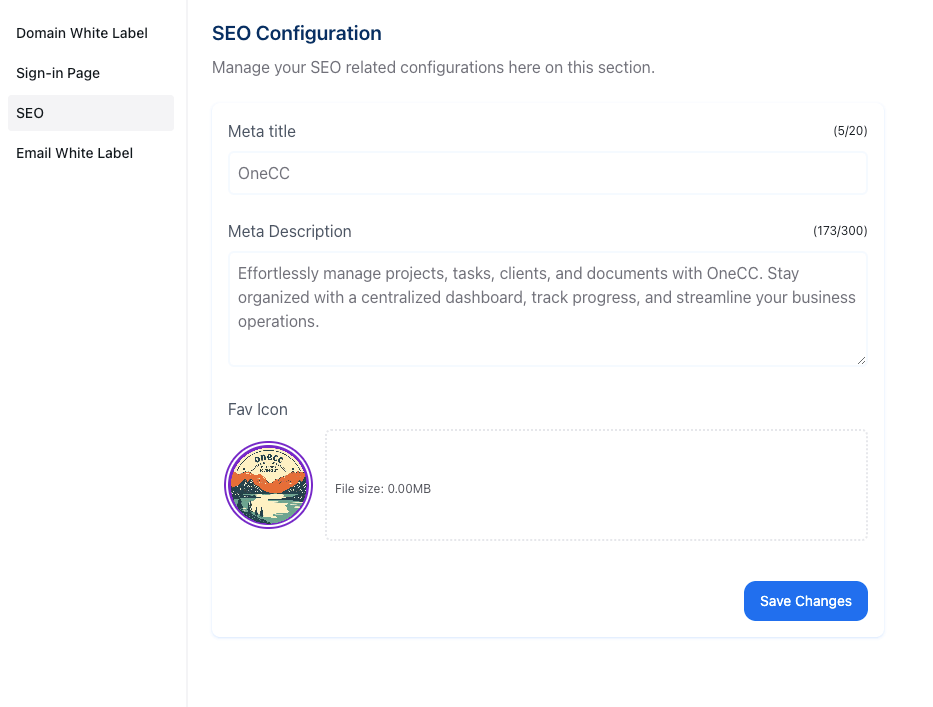
In addition to customizing the appearance, you can update the SEO metadata for your white-label portal. Go to the SEO settings and update the meta title and meta description according to your preferences. You can also upload a custom favicon to ensure consistent branding across the platform.
Step 8: Configure White Label Email Setup
To use your custom domain for emails, you need to configure the sender domain. Start by initiating the email configuration within the White Label Setup of OneSuite. This process is similar to the domain setup.
Step 8.1: Go to the Email White Label Setting
Head to the White Label Setup in OneSuite and click on the Custom Email Setup tab. Here, you’ll see your sender domain listed. By default, this is your whitelabeled domain. Simply click on “Connect Your Domain” to proceed with the setup.

Step 8.2: Receive DNS Records for Your Domain
After clicking to connect your domain, OneSuite will provide a list of DNS records that need to be added to your domain provider’s DNS settings. These records ensure secure and authenticated email delivery.
The records include:
- 3 DKIM records: These validate the authenticity of your emails.
- 2 SPF records: These authorize OneSuite to send emails on behalf of your domain.
- 2 DMARC records: These protect your domain from unauthorized email use.
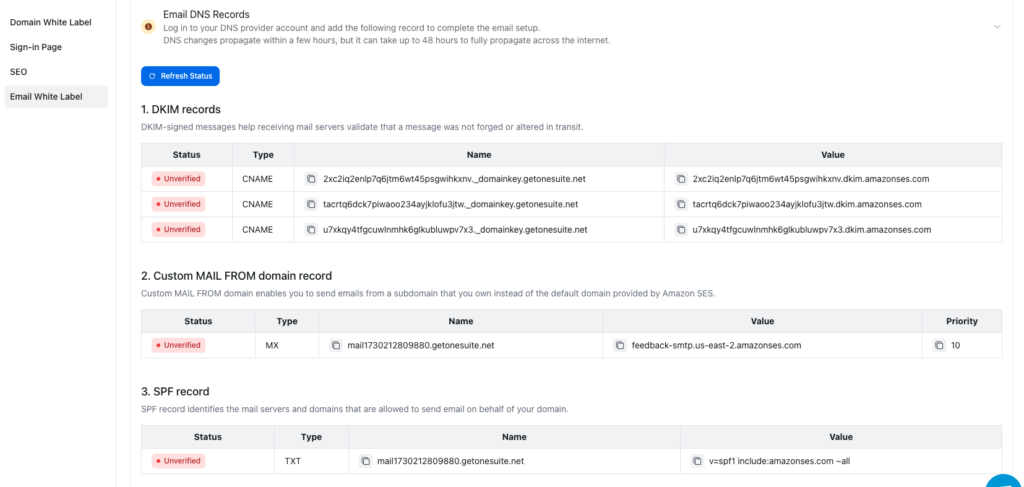
NOTE: If you are using Cloudflare, set the proxy status to “DNS Only” for all CNAME records. Toggle the orange cloud icon to gray (DNS Only) in Cloudflare’s DNS settings before saving.

Step 8.3: Add DNS Records for Email Configuration
Log in to your domain provider’s account (e.g., Namecheap, Cloudflare). Navigate to the DNS settings and add each record provided by OneSuite. Make sure to enter them exactly as instructed.
- DKIM records: Prevent email forgery and validate email authenticity.
- SPF records: Specify which servers can send emails on your behalf.
- DMARC records: Define how to handle unauthorized emails sent from your domain.
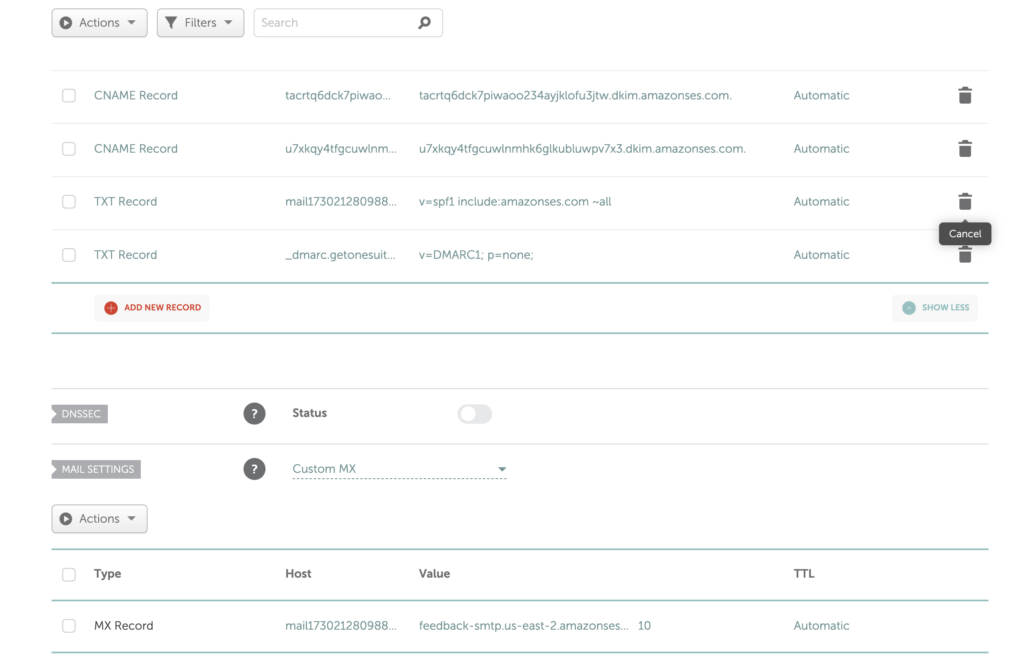
After entering the records, save your changes.
Step 8.4: Wait and Refresh Status to Verify DNS Propagation
DNS changes might take a few minutes to propagate, but in some cases, it could take up to 48 hours. Periodically refresh the status in OneSuite’s White Label Setup to confirm that all records have been processed. Once the records are active, the connection status will be updated to Verified.

Step 8.5: Add Sender and Reply-To Email Addresses
Now, add the sender email address that will appear in all transactional emails sent from OneSuite. This email address doesn’t need to have a mailbox—it will simply serve as the sender’s name for outgoing emails.
Additionally, set a reply-to email address where any responses from recipients will be directed. This address should be linked to an active mailbox to ensure you can receive and respond to replies efficiently.

Once these steps are complete, your white label email setup will be fully configured. All emails sent from OneSuite will now use your custom domain, providing a professional, branded experience for your clients.
⚡️Read also: How to Create a Client Portal in 4 Easy Steps
Footnote
By following these steps, you’ve successfully set up your white label customization in OneSuite. Your platform now operates under your custom domain, and all transactional emails are sent from your branded email address, reinforcing trust and professionalism. With your login page and portal reflecting your brand identity, your clients will enjoy a seamless, cohesive experience.
If you encounter any issues during the setup or need assistance, feel free to reach out to OneSuite’s support team. You now have everything in place to offer a fully branded, professional experience—elevating your agency to the next level!
Find a Better Way to Grow
OneSuite streamlines projects, clients, and payments in one place, making growth hassle-free.
