
Imagine taking on a $4,000 website project… and ending up doing over $7,000 worth of work—with nothing extra to show for it.
That’s exactly what happened to a freelance web designer I know. The project started smoothly: a few emails, a friendly client, and a clear vision. They agreed on the basics, shook virtual hands, and got to work—without a formal contract.
Then came the “quick” requests.
New layouts, extra screens, design tweaks, animations. One after another.
All framed as small additions, but each one took hours—sometimes days.
Trying to keep the client happy, the designer kept going. But when the final invoice was sent, the client simply disappeared.
No contract.
No leverage.
Just weeks of unpaid work and a hard lesson learned.
In this post, I’ll show you how to avoid stories like this by using a clear, simple web design contract. I’ll even share a simple but solid web design contract template—free to download and easy to customize.
⚠️ Disclaimer: I’m not a lawyer, and this isn’t legal advice. Always speak to a qualified attorney when drafting contracts.
Free Web Design Contract Template (Download First!)
Before we dive in—if you’re here for the contract, go ahead and grab it now:
It’s a clean, straightforward template that covers almost all the essential steps—from scope and timelines to payments, revisions, and handoff.
But don’t stop here. The rest of this article breaks down each section of the contract, so you understand exactly what it includes and how to make it work for your projects.
Why Web Design Contracts Are Non-Negotiable (Even for Small Projects)
It might feel like overkill to ask for a contract—especially on smaller projects where everything seems casual and friendly. But skipping that step is exactly what leaves you vulnerable.
A contract isn’t about being overly formal or legalistic. It’s about making sure everyone is on the same page before the work begins.
Here’s what a solid design contract does for you:
- Sets clear boundaries around what’s included—and what’s not
- Defines payment terms and protects you from delays or non-payment
- Prevents scope creep by documenting the original agreement
- Clarifies timelines, responsibilities, and revision limits
- Gives you legal standing if something goes wrong
It’s one of the simplest ways to protect your time, your creativity, and your business.
See Also: Free Web Design Proposal Template: How to Write It
What to Include in Your Web Design Contract
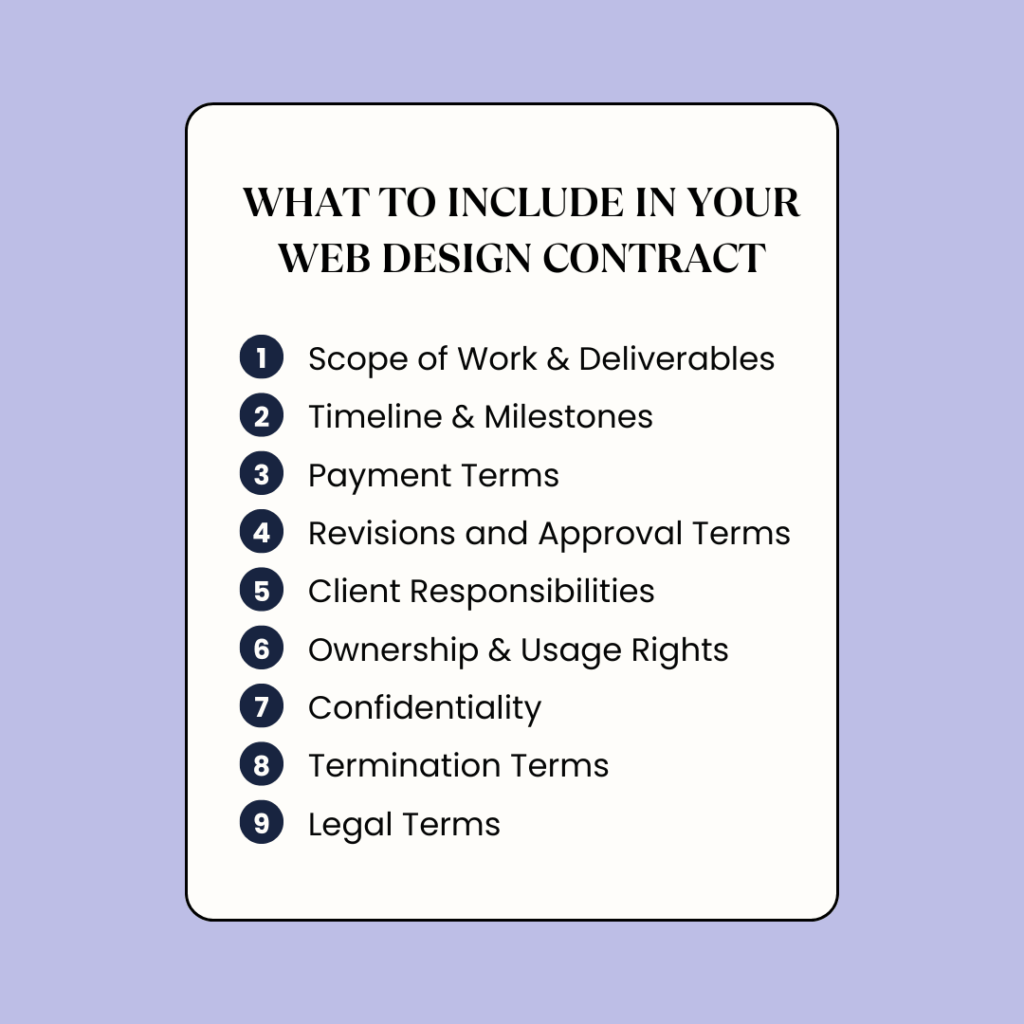
A good contract doesn’t have to be complicated—it just needs to be clear, specific, and aligned with how you work.
Here are the key sections every web design (even dev) contract should include:
1. Scope of Work & Deliverables
This is the foundation of your contract. It defines what you’re agreeing to create—whether that’s design files, a fully built website, or both—and just as importantly, what you’re not responsible for.
Make it crystal clear by listing:
- Specific screens, pages, or assets you’ll design
- Design tasks (e.g. wireframes, UI mockups, responsive layouts)
- Development tasks (if applicable—e.g. Webflow build, CMS setup, animations)
- Final deliverables (e.g. Figma, PSD, PNG, live website, login credentials)
- Support or post-project help (like training, handoff instructions, or revisions)
💡 Pro Tip: Be specific. Terms like “dashboard,” “responsive version,” or “basic setup” can mean very different things to different people. Spell out exactly what’s included—design, development, or both—so there’s no room for assumptions.
Also include a note that only final, approved deliverables are handed over. Unused drafts, early concepts, or partial builds stay with you unless otherwise agreed.
2. Timeline & Milestones
Setting a clear timeline helps keep the project on track and ensures both sides know what to expect—whether you’re delivering design files, a live site, or both.
Break down the project into key phases, such as:
- Project start and estimated completion date
- Delivery of initial concepts or mockups
- Client feedback windows
- Development or build phase (if included)
- Final delivery or website handoff
💡 Pro Tip: Include a note that delays in client feedback can shift the overall timeline. Something like: “Client response delays beyond 3 business days may extend the project schedule.”
This protects your time and avoids being blamed for late deliveries.
3. Payment Terms
Clear payment terms protect your time and ensure you get paid without delays—whether you’re delivering design files, development work, or both.
Here’s what to include:
- Total project fee
- Payment schedule (e.g. 50% upfront, 25% at mid-point, 25% upon completion)
- Accepted payment methods (bank transfer, PayPal, Stripe, etc.)
- Hourly or day rate for any work outside the original scope
- Late payment policy
💡 Pro Tip: Be specific about late fees. For example:
“Payments not received within 5 business days of the due date will incur a 1.5% monthly interest charge on the outstanding balance.”
Also, make sure the client understands that final deliverables (whether it’s a Figma file or a live website) won’t be handed over until full payment is received.
4. Revisions and Approval Terms
Revisions are a natural part of the creative process—and they help keep clients happy. But without clear limits, they can spiral into endless back-and-forth and delay the project.
Make sure to outline:
- How many rounds of revisions are included in the project fee
- What counts as a revision (vs. a new request or scope change)
- How long clients have to request revisions (e.g. within 3–5 business days of delivery)
- Your rate for additional revision rounds (e.g. $150 per round)
- How final approval will be given before handoff or launch
💡 Pro Tip: Ask clients to provide feedback in writing and through a single point of contact. This avoids conflicting feedback and speeds up approvals.
5. Client Responsibilities
A smooth project depends on collaboration—and that includes clear responsibilities on the client’s side.
Make it clear that the client is responsible for:
- Providing all necessary content, brand assets, and access credentials on time
- Giving timely, consolidated feedback (usually within 2–3 business days)
- Designating a single point of contact for all communication and approvals
- Meeting agreed deadlines for approvals, content delivery, and payments
💡 Pro Tip: When clients delay, projects stall. It’s helpful to include a note in your contract that extended delays may pause the project or shift your availability.
6. Ownership & Usage Rights
Once the project is complete and fully paid for, the client receives rights to the final approved deliverables—but not everything created during the process.
Be clear about:
- What the client owns (e.g. final design files, live website, approved assets)
- When ownership is transferred (usually after full payment)
- That unused concepts, drafts, and rejected ideas remain your property
- Your right to display the finished work in your portfolio or marketing materials
- That the client may not modify, resell, or reuse the work without your written permission
This protects your creative rights while giving the client what they need to move forward.
7. Confidentiality (Optional but Recommended)
During the project, you may receive access to sensitive client information—like strategy documents, login credentials, or internal materials. It’s important to handle this responsibly.
Your contract should state that:
- Any information shared by the client will be kept strictly confidential
- You will only use that information for the purpose of completing the project
- You won’t share or disclose it to anyone without written permission
Also, include a time limit for how long confidentiality must be maintained—typically 2 years after the project ends, unless otherwise agreed.
This builds trust and shows the client you’re a professional they can rely on.
8. Termination Terms
Sometimes projects need to end early—and that’s okay, as long as the terms are clear.
Your contract should include:
- That either party can terminate the agreement with [X] days’ written notice
- If the client cancels:
- The initial deposit is non-refundable
- Any completed work beyond that point will be billed at your hourly rate (e.g. $100/hour)
- If you cancel the project (for reasons like lack of communication or misalignment):
- A prorated refund of the unused portion of the deposit will be provided
- You may choose whether or not to deliver any partially completed work
💡 Pro Tip: Always set expectations about communication early. If a client goes silent for weeks, include a clause that allows you to pause or terminate the project after a certain period of inactivity (e.g. 10–14 business days). It protects your time and schedule.
9. Legal Terms
You don’t need to be a lawyer to include basic legal protection in your contract. Just a few clear clauses can help prevent misunderstandings and protect both you and your client if something goes wrong.
Include:
- Dispute Resolution – Explain how any issues will be handled.
Example: “Both parties agree to first try to resolve any disagreements through direct communication. If that doesn’t work, the issue will go to mediation, and if needed, binding arbitration.” - Governing Law – Mention which country or state’s laws will apply to the agreement.
Example: “This agreement will be governed by the laws of [Your Country or State].” - Limitation of Liability – Limit your liability to the total amount the client has paid.
This protects you from being held responsible for things beyond your control. - Digital Signatures – If you’re signing the contract online using tools like OneSuite or Adobe Sign, make it clear that e-signatures are legally binding and compliant with standards like eIDAS (for EU), UETA/ESIGN Act (for US), or your local regulations.
💡 Pro Tip: If you’re based in India, Indonesia, or another non-Western country and your client is in the US or Europe, it’s often a good idea to list their local law (e.g., California or Germany) as the governing law. It helps build trust and keeps things smooth—especially when dealing with international clients or payment platforms.
Sending the Contract and Getting It Signed
Creating the perfect contract is only half the job. Getting it signed—efficiently and professionally—is what makes it real.
Here’s how to handle it professionally:
- Use a secure e-signature platform like OneSuite or DocuSign.
- Send the contract as a PDF or through the platform directly
- Ensure the client reviews and signs before you begin any work—no exceptions
- Keep a copy for your records and give one to the client
If you’re working with international clients, make sure your e-signature process complies with recognized standards like:
- eIDAS – for clients in the EU
- UETA/ESIGN Act – for US-based contracts
- Local e-signature laws if you or your client are based elsewhere
💡 Pro Tip: Add a sentence in your contract that explicitly states digital signatures are legally valid and binding under applicable laws. It removes ambiguity and keeps things clear.
See Also: Download a free graphic design contract template to streamline your workflow, prevent confusion, and protect your work with clear terms and clauses.
How to Send and Get Your Contract Signed in OneSuite
OneSuite makes it simple to send contracts, collect legally binding signatures, and keep everything organized—without needing extra tools.
1. Sign in and Go to Documents
If you already have a OneSuite account, log in to your account.
If not, create a free account—no credit card required.
Once you’re logged in, navigate to the Documents module from the left sidebar.
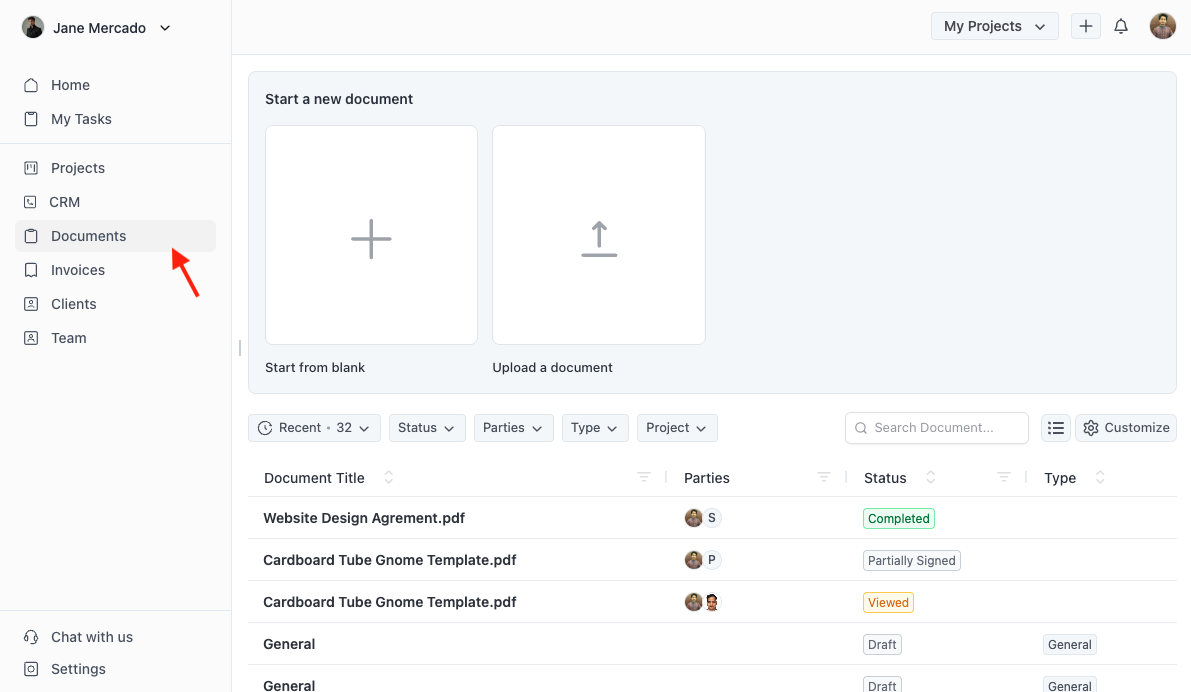
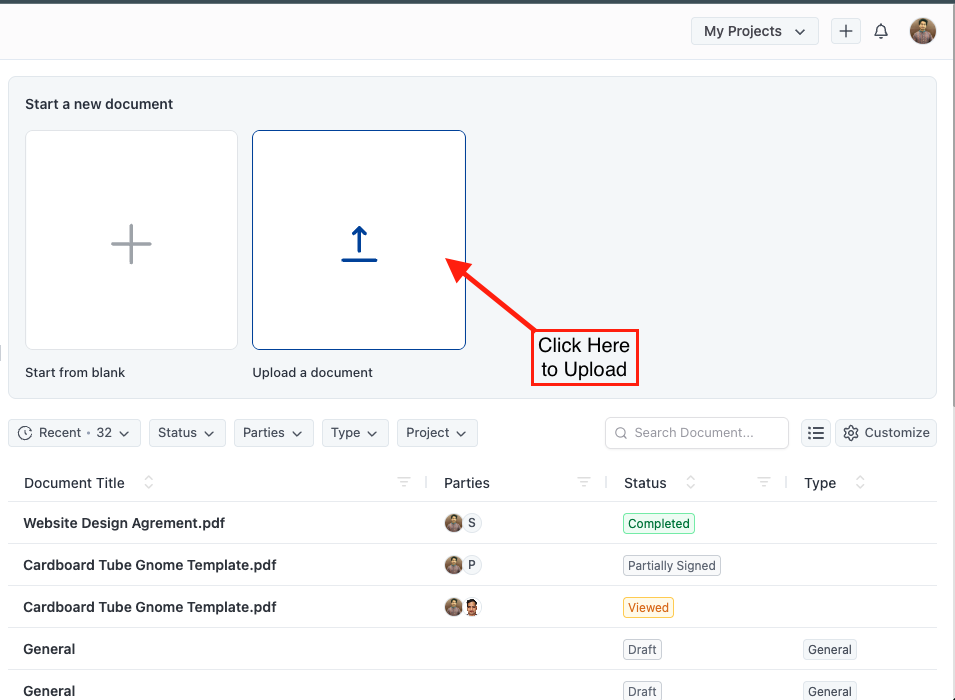
2. Upload Your Document
Click the “Upload Document” button and select your contract PDF.
Make sure your contract is final—proofread everything and confirm the details before uploading. Once signed, the document becomes non-editable.
3. Enable Signature Fields and Assign Parties
After uploading your PDF, you’ll see the signing interface where you can assign parties and place signature fields on the document.
Here’s how to do it:
- On the left, you’ll see a “Parties” panel. By default, you’ll see “1st Party” listed (that’s you or your business).
- Click “Add new party” to add your client or any additional signers. This will label them as “2nd Party”, “3rd Party,” etc.
- Below each party’s name, you can drag and drop the following elements onto your document:
- Signature
- Text
- Checkbox
- Date
- Initials
Make sure to:
- Assign each signature field to the correct party (1st Party for you, 2nd Party for the client)
- Place all required fields on the document (usually Signature, Date, and optionally Initials or Checkboxes).
✅ When you’ve finished assigning fields and parties, click the blue “Send” button at the top right to send the document for signature.

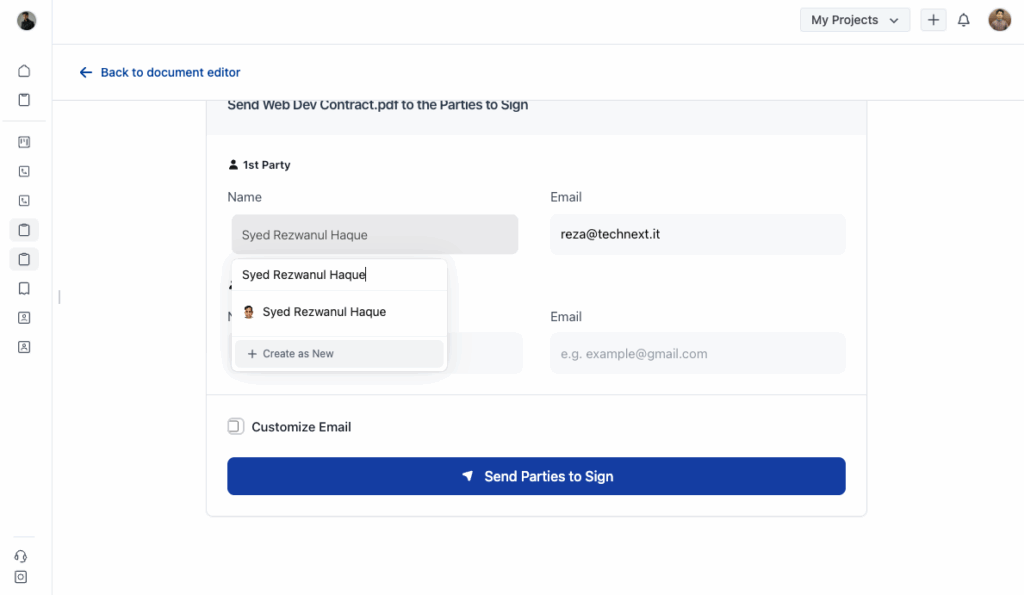
4. Add Your Signers
After placing signature fields, you’ll assign who will sign the document.
- For each party (1st Party = you, 2nd Party = client), you can either select someone from your existing contacts (clients, employees, etc.) or create a new signer by entering their name and email.
- OneSuite will auto-suggest matches as you type, making it easy to reuse contacts from your CRM or previous documents.
Customize the signing email:
Click “Customize Email” to edit the subject, message, or add context before sending. This helps you guide the signer and personalize their experience.
Once you’ve added all signers and reviewed the email, click “Send Parties to Sign.”
Your signers will receive a secure email with a link to sign—no OneSuite account needed.
5. Sign and Get Signed (Both Parties)
After sending the document, each signer will get a secure email with a signing link.
- Client Side:
Clicking the link takes them to the document, where a signature indicator shows exactly where to sign.
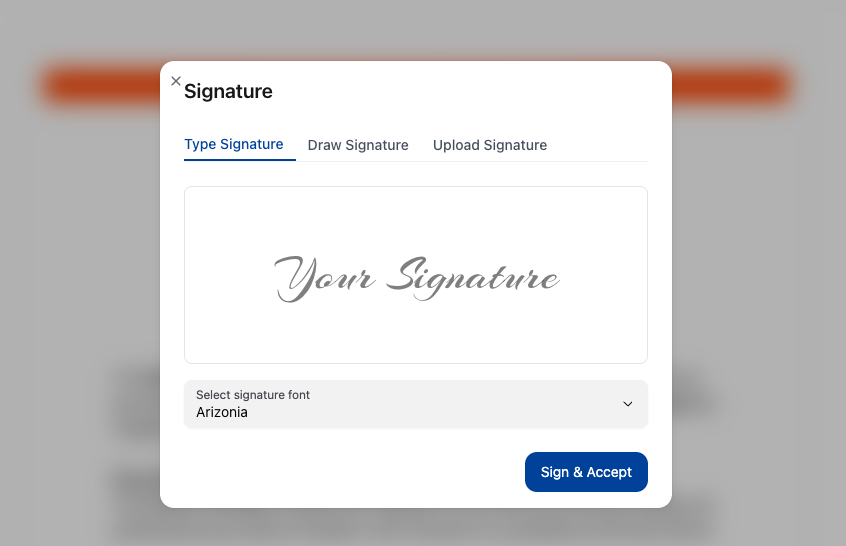
Once clicked, a pop-up lets them type, draw, or upload their signature.
They finish by clicking “Sign & Accept.” - Your Side:
After the client signs, you’ll get a notification to sign your part.
Use the same method to complete the process.
Once both parties sign, the document is locked and safely stored in OneSuite.
Once both you and your client have signed the document, it will be locked to prevent any further edits. You’ll see a confirmation screen showing that the signing process is complete. From there, you can download both the signed contract and a signature certificate, which includes timestamps, signer names, and legal verification details. This ensures you have a professional, legally valid record of the agreement—ready to store, share, or reference whenever needed.

Footnote
Contracts aren’t just for large projects—they protect you even on the smallest jobs. Always make sure your agreement is signed before starting any work or accepting payment. Using a tool like OneSuite makes the entire process easier, from creating and sending contracts to collecting legally binding e-signatures and securely storing signed copies. Keep a copy of every signed contract and the accompanying signature certificate for your records.
Most importantly, make sure your agreement covers all the essentials: scope of work, timeline, payment terms, revisions, ownership rights, legal protection, and how either party can exit the agreement if needed. A clear, well-written contract not only protects your time and creativity—it builds trust and sets the foundation for a smooth working relationship.
Find a Better Way to Grow
OneSuite streamlines projects, clients, and payments in one place, making growth hassle-free.

