It was a busy day, and after working on multiple projects, I went out with friends to relax. While at the restaurant, my phone rang—it was Ron.
“Zikra, why aren’t you responding to my emails? What’s the update on the project?”
I realized I hadn’t sent the file yet, and I didn’t have my laptop with me. I had to find the file on my phone and email it quickly. My friends were annoyed, I was stressed, and my break was ruined. When I got home, I saw even more emails waiting for me. That’s when I knew something had to change.
I decided to create a client portal.
Within days, things were different. My clients could log in to see updates, review files, and make payments—without emailing me. My inbox became more manageable, and I could focus on the work I enjoyed.
Creating a client portal saved me time, improved my client’s experience, and brought peace to my workday.
Key Takeaways
- Learnt, an electronic gateway to a collection of projects accessible over the Internet through a web browser, is called a client portal.
- With OneSuite, there is no extra hassle in creating and launching a client portal. Just create a client and invite your client to their portal with just 4 steps.
- Importance of client portal
- 6 key features for a best client portal.
What is a Client Portal?
Honestly, I had no clue what a client portal was until I heard about it a while back. But when I started struggling to keep up with multiple projects, I decided to look into it.
A client portal, I found, is a platform that allows your clients to participate in and actively oversee their projects. This involvement builds transparency and gives clients a sense of control and trust in client relationships, all in one place.
This was exactly what I needed. I wanted something where all of my projects and tasks would be recorded, and my client could access that platform and check out the progress without asking me over and over.
Let’s break it down for you: the client portal is a cloud-based platform where you can update all your tasks and projects. The client can log in through an electronic gateway, browsing the web to see how things are going.
A good portal even offers extra tools, like file sharing, invoicing, and branding options, making it easier for both you and your clients to stay organized and connected.
How to Create a Client Portal in Just 4 Steps
I had no idea creating a client portal could be so easy! I thought I’d need tech skills or have to hire an expert. But then I found a no-code platform, and it made my day.
Here, I’ll share the 4 easiest steps to set up your own client portal; you will thank me later. 😉
Step 1: Choose a No-code Portal Builder
Why am I talking about no-code portal builders? Because no-code portal builders don’t require any tech skills—you can set one up just by dragging and dropping.
Many no-code tools, such as OneSuite, Dubsado, and Noloco, allow you to create a client portal. But some of these are complicated and hard to navigate.
Here, I will show you the easiest way to use the simplest tool, OneSuite.
Do you know what the most interesting thing in OneSuite is?
You don’t even need to create your portal manually in OneSuite. Just add your client data and invite them in; the tool will organize the portal for you. Then, you can customize it according to your requirements.
Doesn’t it sound great? Let’s move to the next step then.
Step 2: Create Client With All the Details
Have you already hopped into OneSuite? It has a 14-day free trial; you can get in easily.
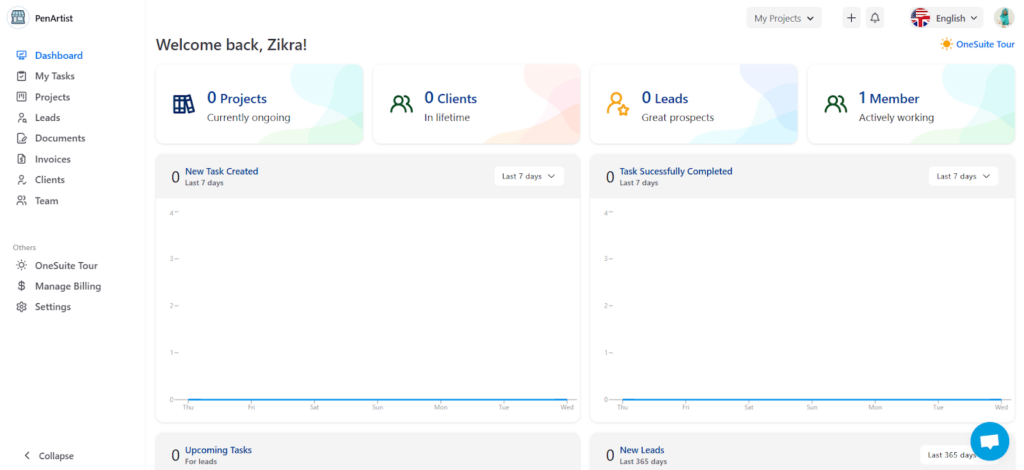
So, you will see a Dashboard that looks more like this ⬇️
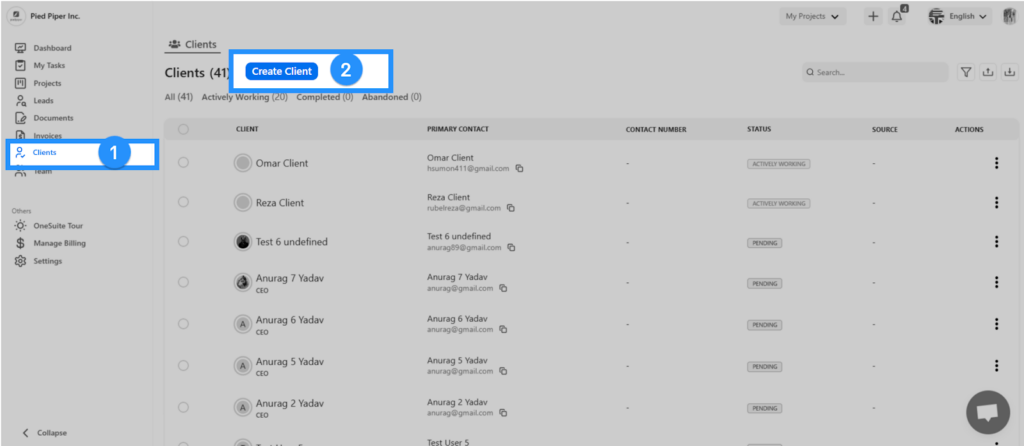
To create a client with all the details,
- tap into Clients from the sidebar and then Create Client.
On the right side, a page with a form will pop up.
- You just need to fill out the form and Save it.
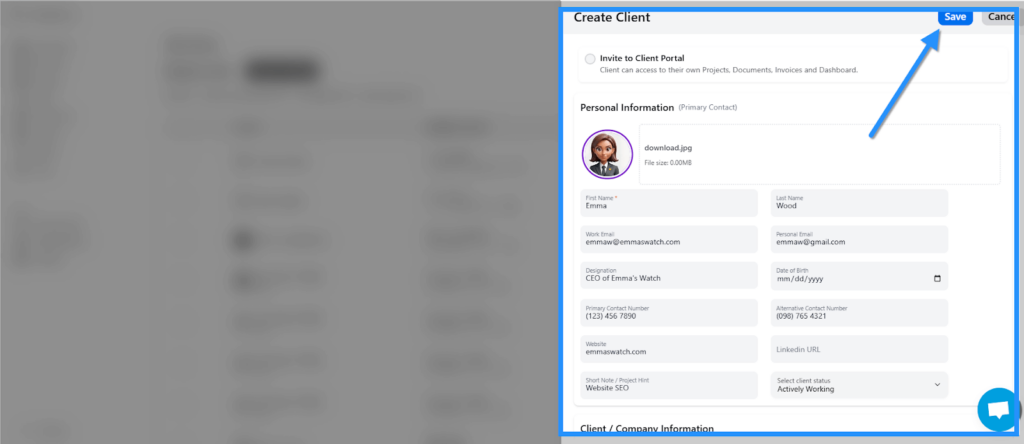
That’s it your Client Created Successfully.
Step 3: Invite Your Clients to the Portal
OneSuite allows you to invite your clients to the portal in 2 ways.
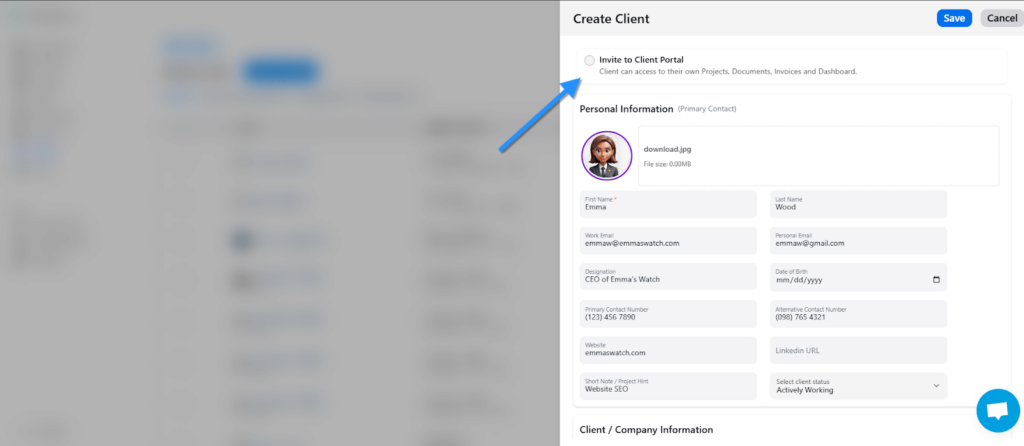
- While you were creating a client, in the form, there was an option to Invite To Client Portal. By checking this option, your client will automatically receive an invitation email right after set as a client.
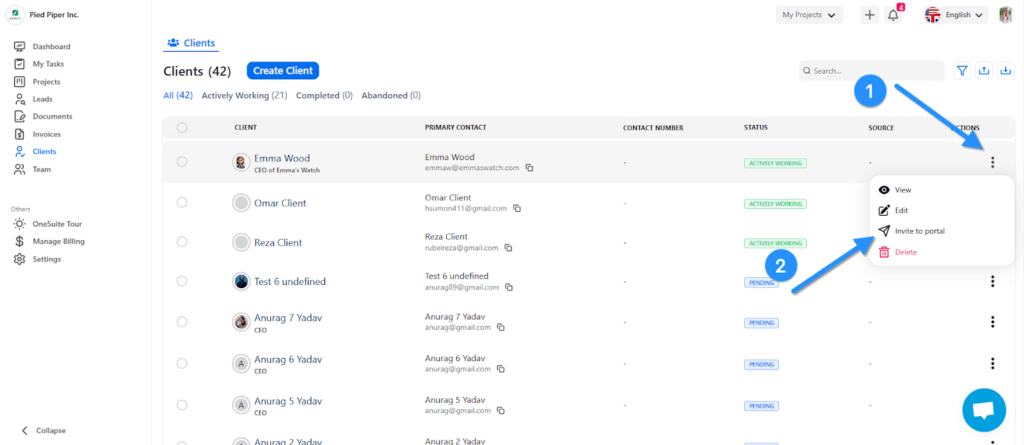
- After creating a client on OneSuite, you will find your new and existing clients in the Clients list. On your selected client’s right corner, you will find 3 dots. Click on it to find a few options, including an Invite To Portal. Click on it, and it’s done; User is Invited to Your Business.
Your client got an invitation email from your business, which will be more like the following image.
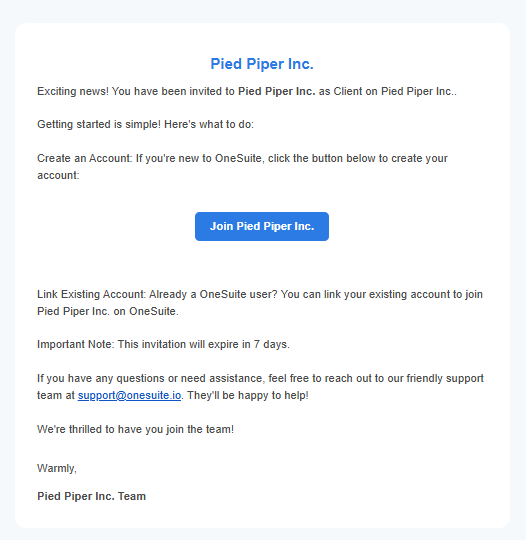
Your client will get onboard easily by clicking Join [Company Name]. And will presented by this Dashboard,
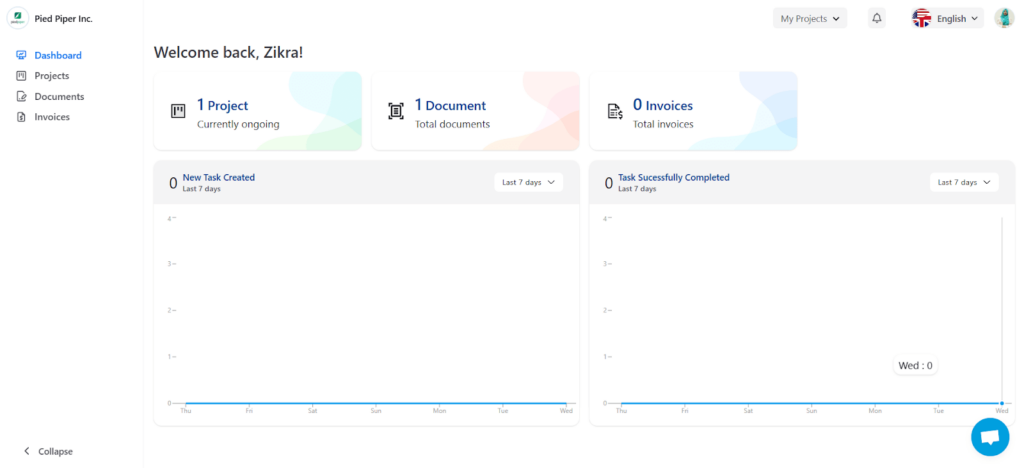
Step 3: Customize Client Portal
OneSuite allows you to customize the Client Access Level for your clients.
If you want them to have Access to view only the projects, you can set it to View Only Access. Where your client can view, add comments, reply, and add files only.
On the other hand, if you want your client to create and update tasks, you can set them to Create and Update Access. Where your clients can create tasks and sub-tasks, add comments, reply, and add files.
You will get this option from Projects.
- Select the Projects you shared with your client.
- Tap on ⚙️ Settings.

You will find the Client Access Level.
Again, suppose you want your client to have more customizable permissions. In that case, you must add your client to the team as a contributor and customize the role and permission. To do so,
- Go to ⚙️Settings
- Click Roles and Permissions and Create New Roles.
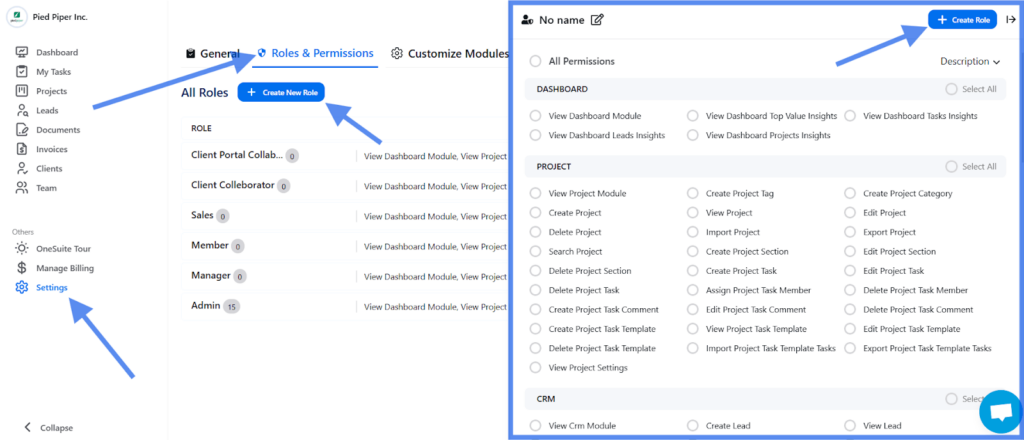
- Now, go to Team and Invite Member.
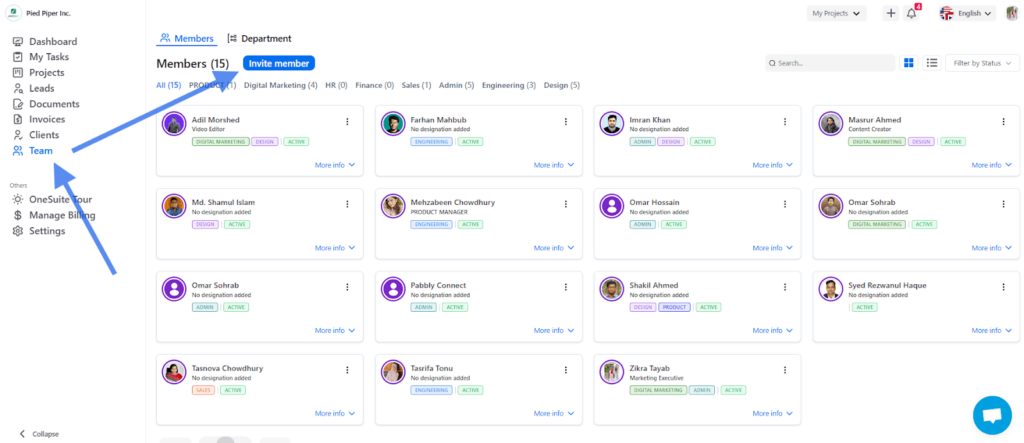
- White inviting members will need to input necessary details about your client and Assign a Role that you customized at step 2, and Send Invitation.
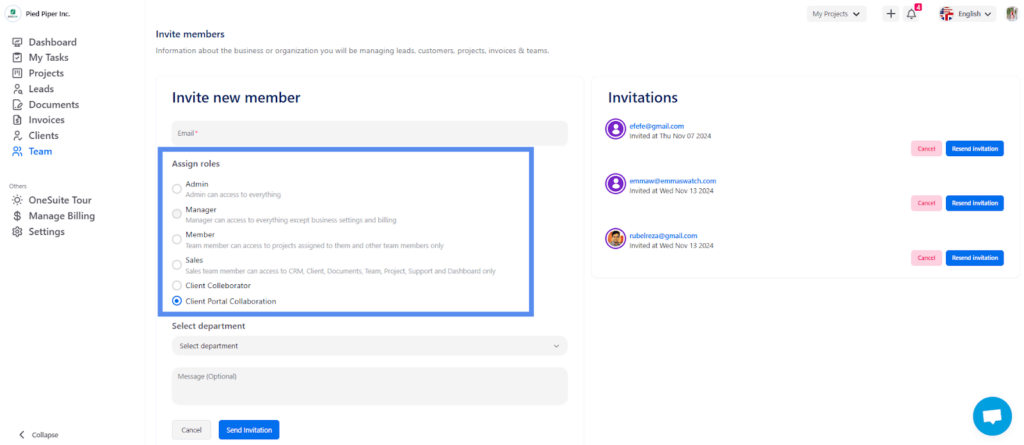
That’s it. Your client got your customizable portal.
Step 4: White label your Client Portal
Imagine your client signing in to the client portal and seeing your business branding on the sign-in page.
Wouldn’t it be more sociable and more credible to your client? Of course, it is.
With OneSuite, you can now white label your business branding so your client will be presented with your business’s special branded pages.
To activate the white label,
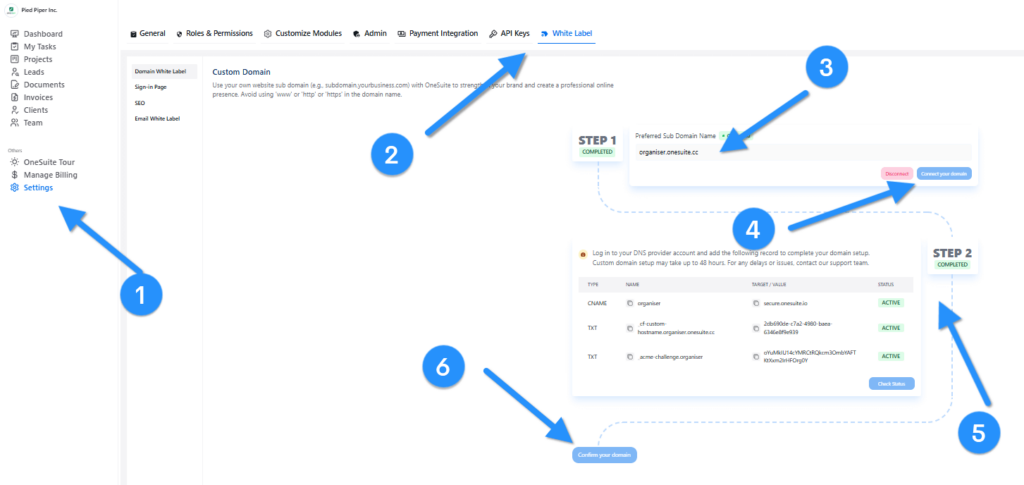
- In your business, you will find Settings ⚙️ at the bottom of the sidebar. Tap on it.
- You will find a White Label option; click here. Here, the business connection with your agency management software starts.
- Write the Preferred Sub Domain Name and Connect Your Domain. For example, organizer.onsuite.cc
- Log in to your DNS provider account and add CNAME and TXTs to complete your domain setup, and tap in to Check Status.
- Confirm Your Domain.
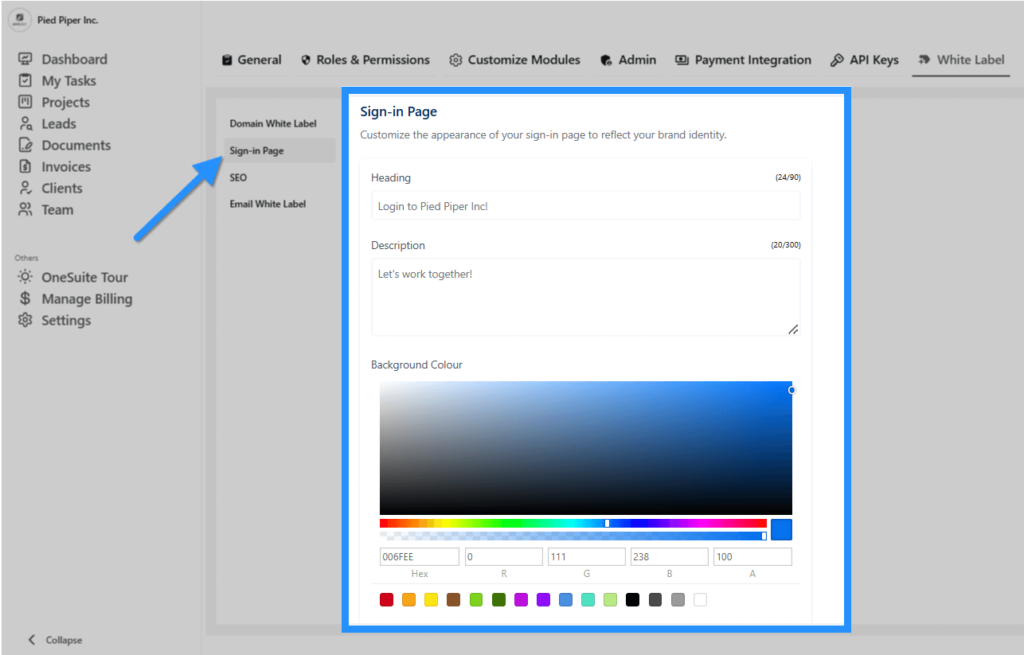
- Now go to the Sign-In Page, which you will find on the left side, right after Domain White Label, and Customize the appearance of your Sign-In page to reflect your brand identity.
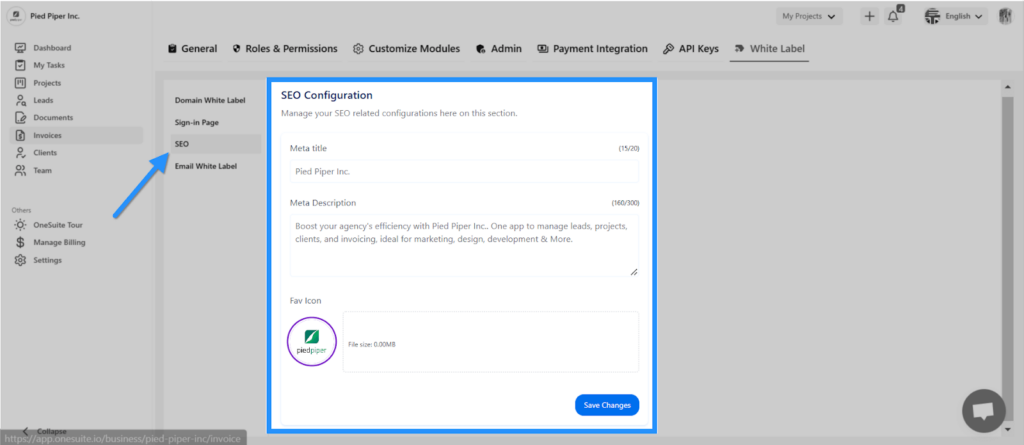
- Manage your SEO-related configurations in the SEO section.
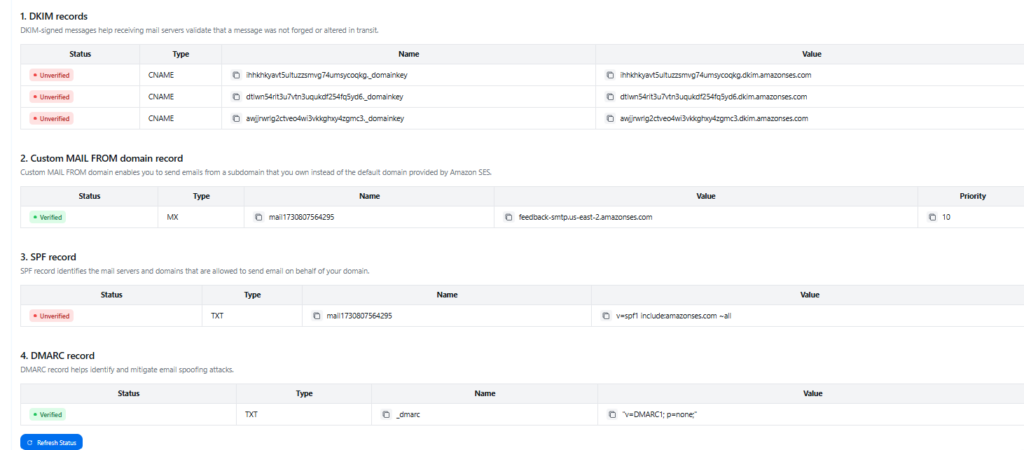
- You can use your own email domain (e.g., email@yourdomain.com) with OneSuite to strengthen your brand and create a professional online presence from the Email White Label.
- Write a Sender Domain and Connect Your Domain.
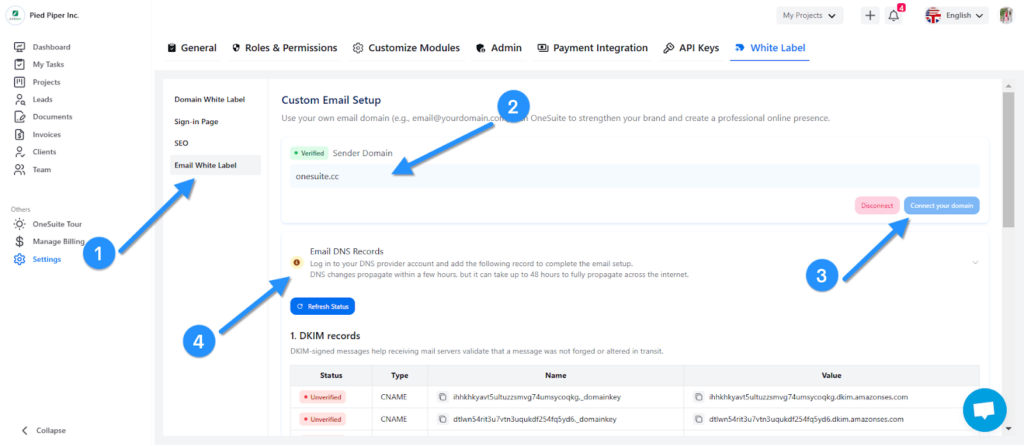
- Log in to your DNS provider account and add DKIM, Custom MAIL FROM domain, SPF, and DMARC Records.
- Now, at the bottom, you can send an email through your Customized Email directly from OneSuite by inputting the Sender Email and Reply-to Email and tapping in Confirm.
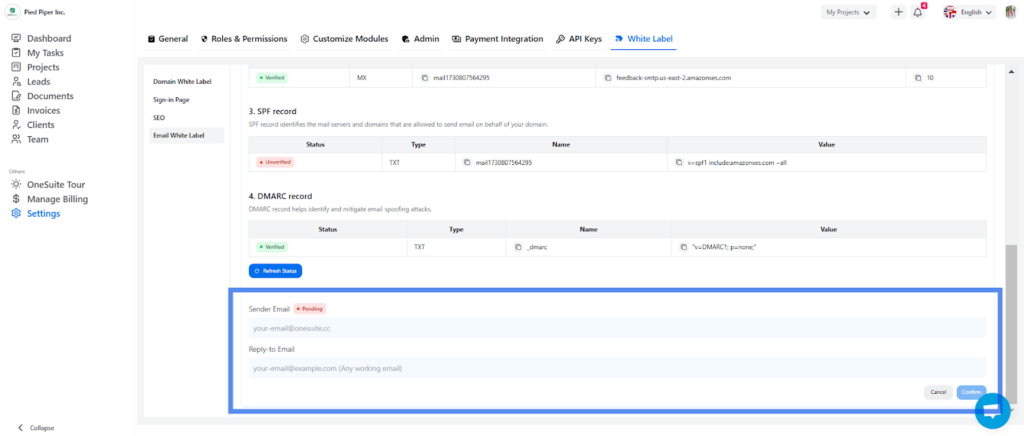
That’s it. Your Client portal is ready with white label.
Why Do You Need a Client Portal for Your Client?
When working with clients, having a client portal to collaborate is essential. Take my own experience as an example—my earlier client management system was a complete mess, full of chaos and confusion.
Let’s see some key reasons why a client portal can make all the difference for you and your clients!
1. 24/7 Updated
A client portal gives your clients round-the-clock access to their project updates and key information, no matter where they are. This means they don’t have to wait for business hours or rely on back-and-forth emails to stay informed.
For you, it eliminates the need to provide constant manual updates, saving time and reducing stress.
2. Easy Document Sharing
Client portals simplify document sharing, making it seamless and secure. With just a few clicks, you can upload, download, and share essential files—like project details or contracts. This feature ensures your clients can always access the latest files without needing updates.
3. Improve Transparency
When you onboard your client into a portal, they get a clear view of their project’s progress. They can track timelines, see what’s being worked on, and check estimated completion dates.
This level of transparency builds trust and keeps your client satisfied. It shows you value their involvement and effortlessly keeps everyone on the same page.
4. Secure Payment Processing
Using a client portal makes handling payments safer and easier for you and your clients. With secure login systems and advanced encryption, sensitive payment details are well-protected from any risks.
Clients can view their invoices, process payments directly, and keep track of their transactions—all in one place. This streamlines the billing process and ensures everyone’s privacy and peace of mind. It’s a seamless way to build trust while keeping finances secure and organized.
5. Improve Collaboration
A client portal transforms the way you collaborate with clients. It centralizes communication, keeping all messages and updates in one place for easy access. This eliminates the back-and-forth of scattered emails and ensures everyone is on the same page.
Clients can also contribute by updating their own details or sharing feedback, making the process more dynamic and efficient. Even when you’re unavailable, automated responses reassure clients that their concerns are being addressed.
The result? Smoother teamwork, reduced errors, and a stronger connection with your clients.
6 Must-Have Feature in Client Portal
So, are you convinced enough like me? Now check out the must-have features from Client portals that you should look for while picking the best one,
1. File and Documents Sharing
A good client portal makes sharing files smooth and secure. Whether it’s contracts, reports, or project files, you should be able to upload and share them without worrying about leaks.
Look for features like version tracking or permissions control to give you and your client more visibility and control over documents.
2. Security
Safety first!
Your client portal should have top-notch security features like encryption and secure logins. This ensures that sensitive data remains protected—whether it’s payment info or confidential documents. After all, trust begins with privacy.
3. White Label
Want to look more professional?
Choose a client portal that allows you to add your branding. This makes the portal feel like an extension of your business. From logos to custom domains, white labeling shows clients you’re invested in their experience.
OneSuite allows you to remove the OneSuite logo from your client portal and brand your business to the client portal.
4. Invoice and Payments
Say goodbye to payment hassles. A client portal should streamline billing, letting you send invoices and your clients make payments directly through it. Bonus points if it supports multiple payment methods for added convenience.
5. Notifications
Nobody likes being left in the dark. Notifications keep clients updated about everything—from project milestones to payment reminders. They’re a lifesaver for busy clients and ensure smoother communication without the need for constant follow-ups.
6. Integrations
Your portal shouldn’t work in isolation. Look for one that integrates with tools you already use, like Google Drive, CRMs, or project management software. It saves time and makes your entire workflow feel connected.
💡 Read Also: Discover top project management software with client portal. Explore Features, Pricing and Reviews to find the best tool for your business.
FAQs on Create a Client Portal
Is Client Portal Software A Good Option?
Yes, Client portal Software is a good option for businesses.
It improves client experience, productivity, and reduces support cost and risk.
Is Client Portal and Customer Portal Same?
Yes, client portal and customer portal are some things.
Both refers to a cloud based portal where clients get access to oversee and supervise the projects.
Start your Client Portal With OneSuite Today!
Creating a client portal is a game-changer for managing client relationships. It helps you stay organized and builds trust and transparency, giving your clients 24/7 access to project updates, document sharing, and more. With tools like OneSuite, setting up a client portal is easier than ever—no tech skills are needed! Leap to streamline your workflow, enhance client satisfaction, and free up your time for the work you love.
Find a Better Way to Grow
OneSuite streamlines projects, clients, and payments in one place, making growth hassle-free.
