Billing your first client can feel confusing. How do you make an invoice? When should you send it? What if they don’t pay on time?
Knowing how to bill clients for the first time ensures smooth payments and a professional relationship.
This guide will give you a simple step-by-step process, invoice examples, and best practices to avoid mistakes.
Let’s get started!
How to Bill a Client For the First Time
Billing a client for the first time can be very sensitive. But with the right steps and a proper billing system, the process becomes simple and stress-free.
Let’s have a look at the steps below—
1. Choose an Billing System
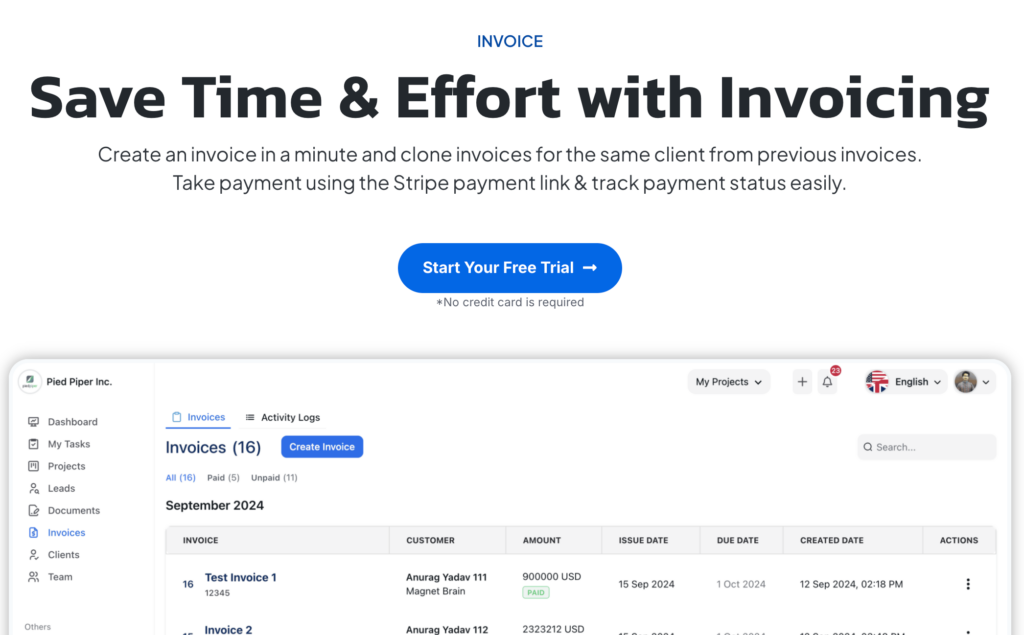
Using invoicing software makes billing faster, easier, and more professional. Instead of manually creating invoices, tracking payments, and following up, a tool like OneSuite automates your entire process.
With OneSuite, you can:
- Create invoices in minutes with pre-designed templates.
- Set up automatic payment reminders to avoid late payments.
- Track all transactions in one place, reducing errors and mismanagement.
While you can manually create invoices using Word, Excel, or Google Docs, this method takes more time and increases the risk of mistakes. If you want a smooth, hassle-free billing process, invoicing software like OneSuite, Bonsai, etc, are the smarter choice.
So, here we will be using OneSuite to bill a client.
2. Log in to Your Business Account
To start billing your client, log in to your OneSuite account. If you don’t have one, sign up and set up your business profile in simple steps.
If you already have an account:
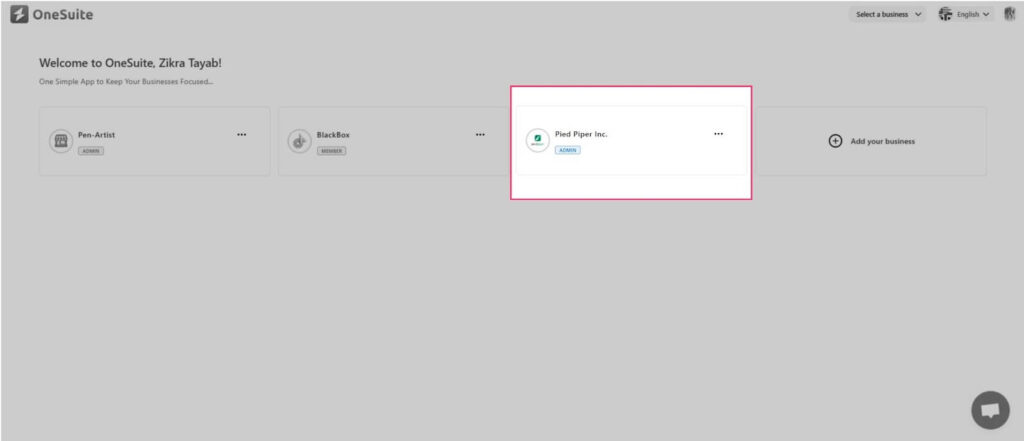
- Click on your Business Profile. Here I clicked on my business for example,
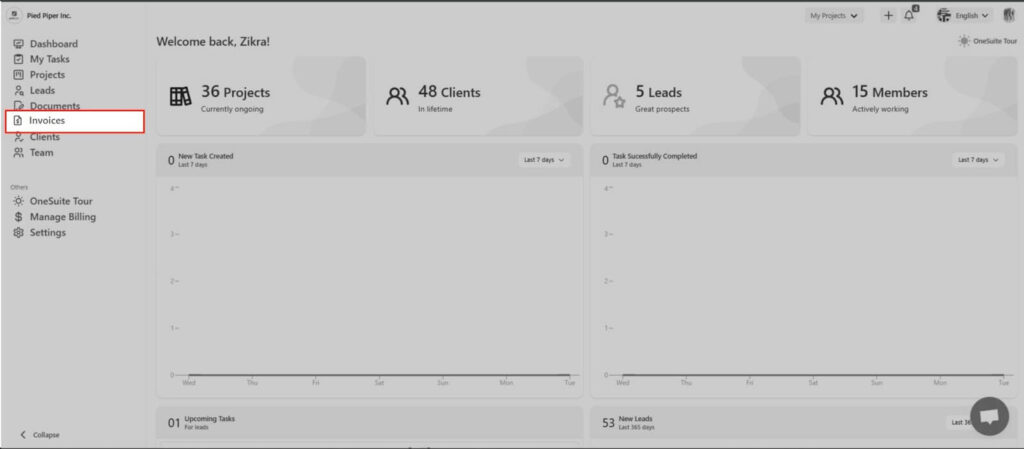
- You’ll be redirected to your Dashboard. It looks something like this.
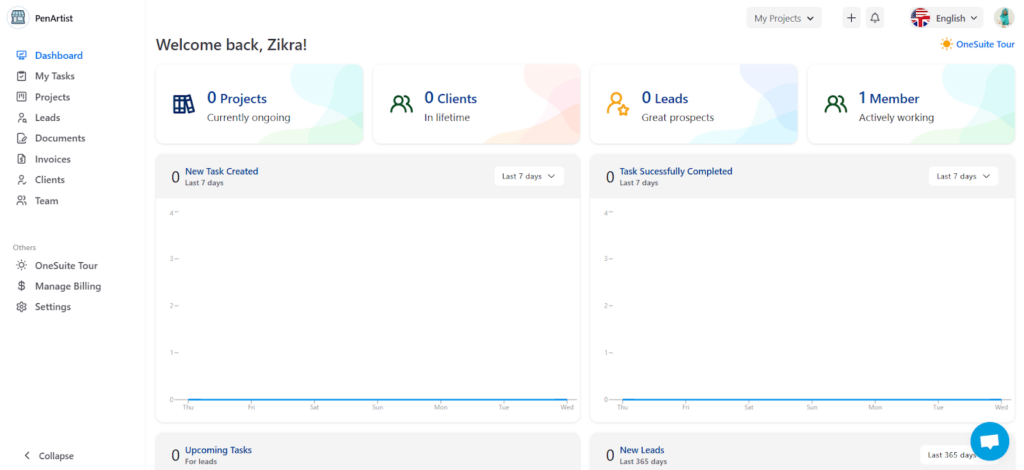
Now, let’s move to the Invoice section to bill your client!
3. Find Invoice and Create One
Now that you’re in your OneSuite Dashboard to bill your client for the first time. Follow these simple steps:
- Find and click on the Invoices tab on the dashboard’s right sidebar.
- This will take you to the invoicing panel, where you can manage all your invoices.
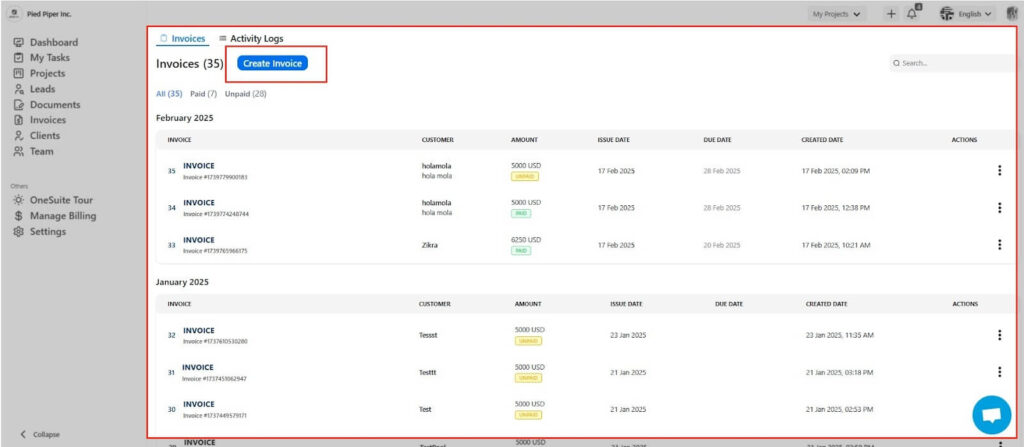
- Look for the Create Invoice button and click on it.
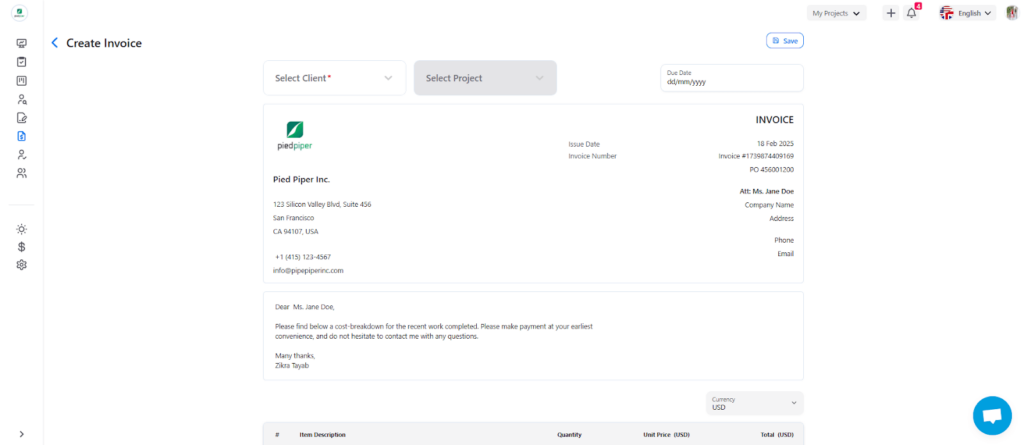
- A raw invoice template will open, allowing you to enter details.
Next step is,
4. Customize and Save Your Invoice
Now that you’ve created a new invoice in OneSuite, it’s time to customize it with all the necessary details. These steps ensure your invoice is professional, clear, and complete.
Your invoice must include accurate client details to ensure smooth processing. Here’s how to do it:
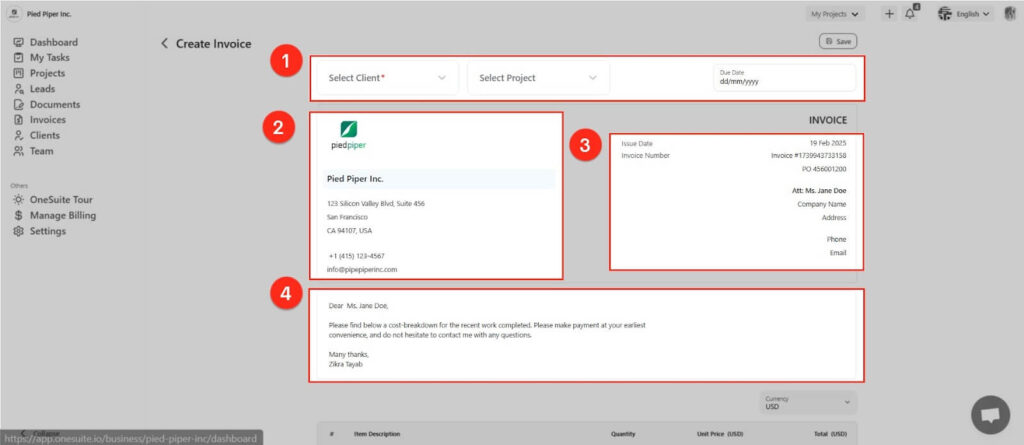
- You will see 3 options above the invoice—Client, Project, and Date. These options enhance clarity and accuracy. Update these accordingly.
- Next, update the invoice details. In this part, Follow best invoicing practices to maintain accuracy and create an ideal invoice. Check the following points while updating the invoice.
- Add your Business Logo and Name if needed.
- Your Business Contact
- Invoice Issue Date and Number
- Client Name and Details.
- Write a Formal Letter (OneSuite automatically generates a formal invoice letter. You can use it as-is or customize it to fit your needs.)
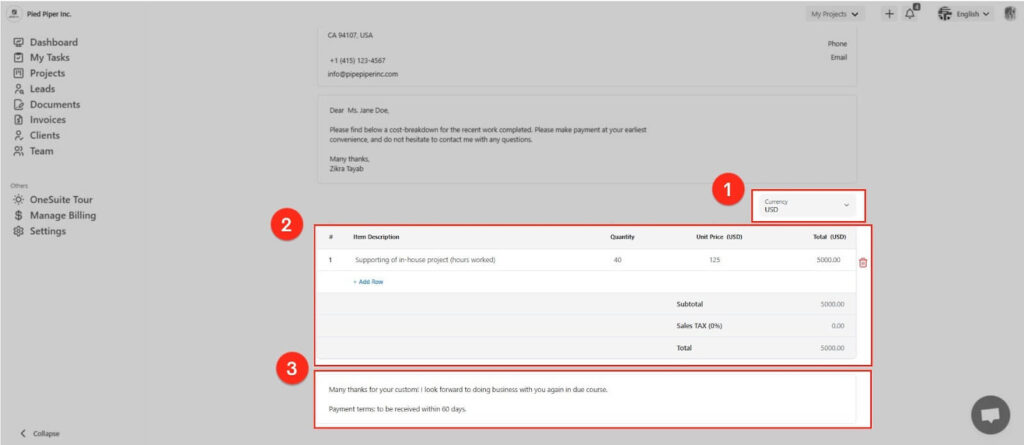
- OneSuite Allows you to select over 100 currencies.
- Ensure all services and fair pricing are updated.
- Lastly, end your invoice with a closing statement—OneSuite provides an auto-generated one, but you can customize it.
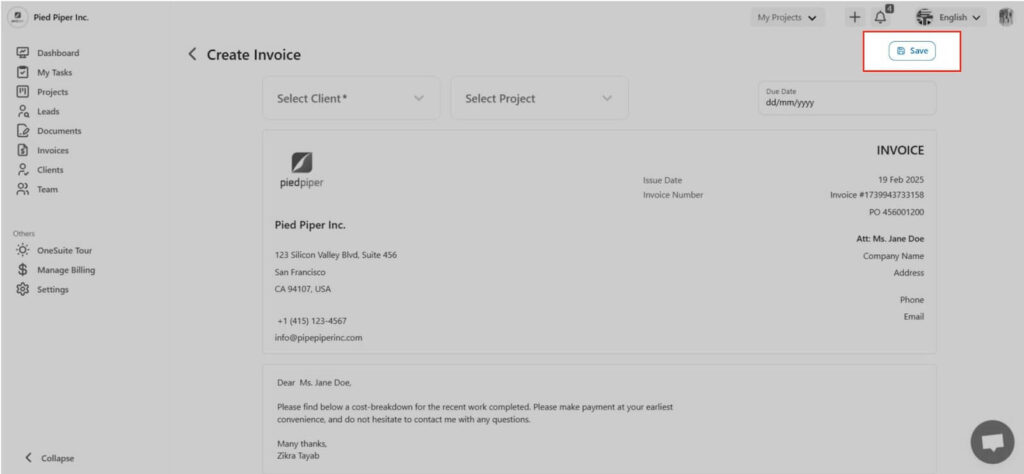
3. Once everything looks good, Click Save to finalize your invoice!
5. Connect Payment Method
The visual is done, but the payment method still needs to be connected. To connect your payment method,
- Go to Settings in the left sidebar under Others.
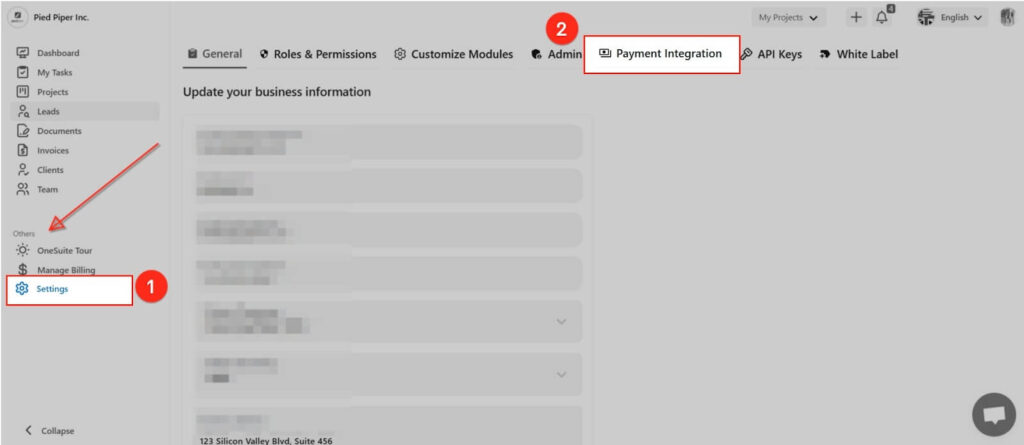
- Click on Payment Integration (5th row).
You will see 4 Payment Methods available. Choose the one where you want to receive payments, and;
- Click on the chosen Payment Methods.
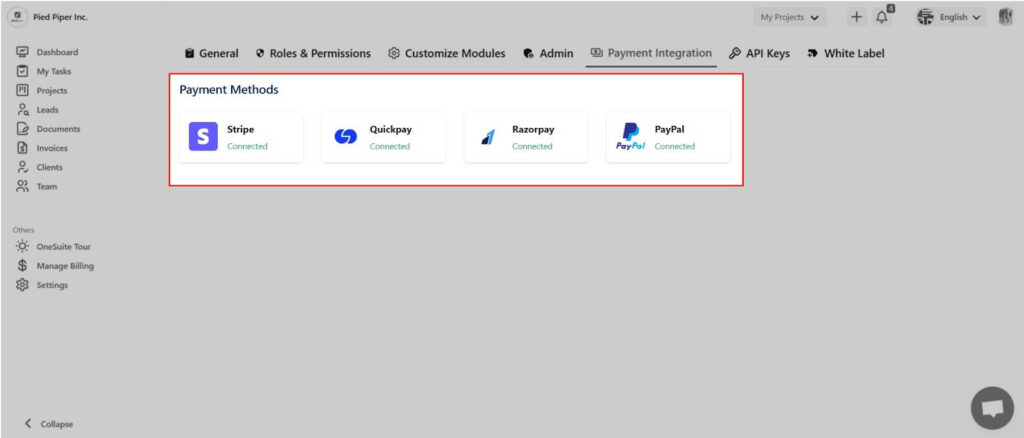
A Payment Integration pop-up will appear, asking you to add a Secret or API key. For example, I select Stripe, and the pop-up will look like this:
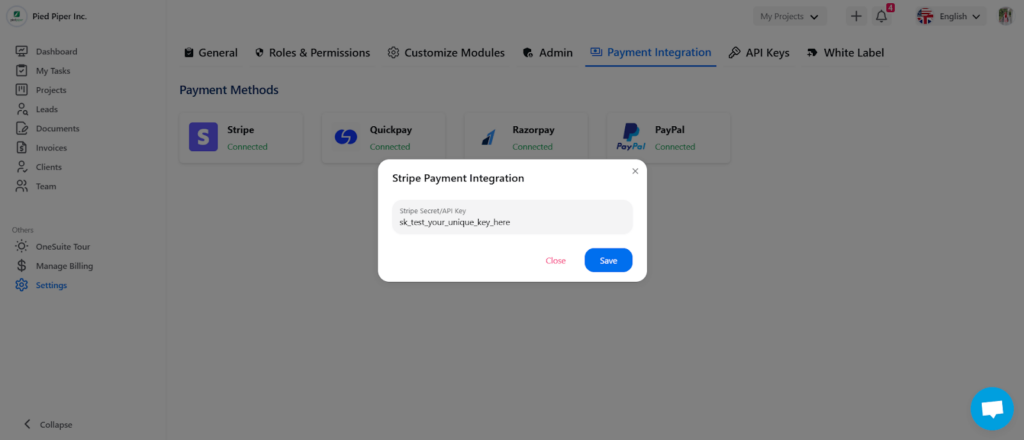
- Now, Enter your Stripe Secret/API key and click Save.
Your payment system is successfully connected.
But suppose your preferred payment Method isn’t listed. You can integrate it using an API (if supported). Here’s how:
- Go to API Keys (next to Payment Integration).
- Click Generate new key.
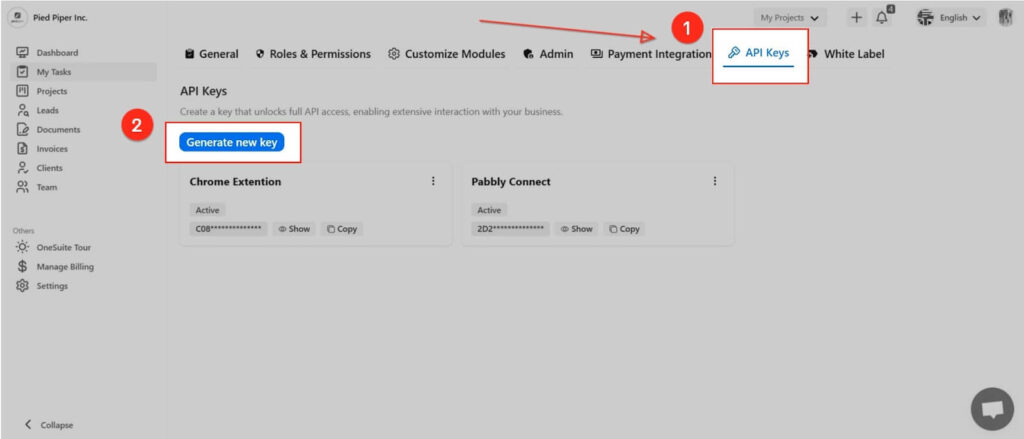
A pop-up will appear with the generated API key.
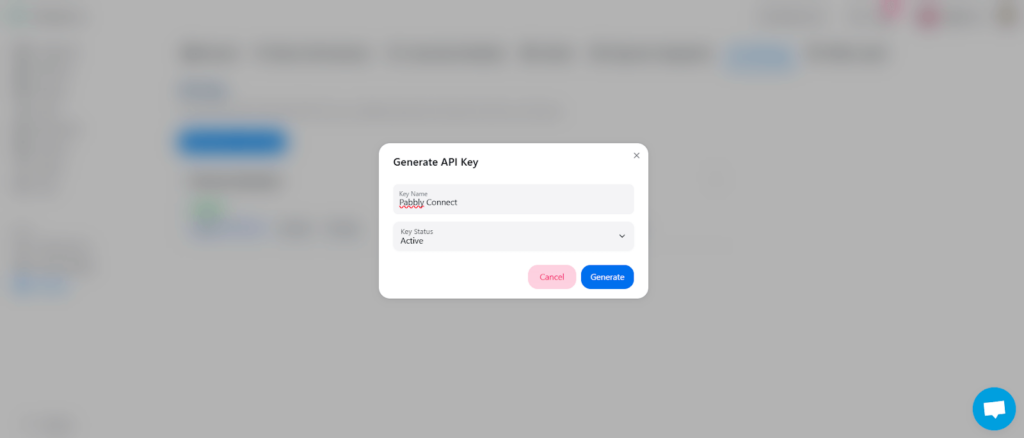
- Enter your payment Method’s Key Name and activate the status
Now Set the payment method from the saved invoice. So let’s go back to your invoice page and select the recently saved invoice. You will see the same page you saw after saving the invoice.
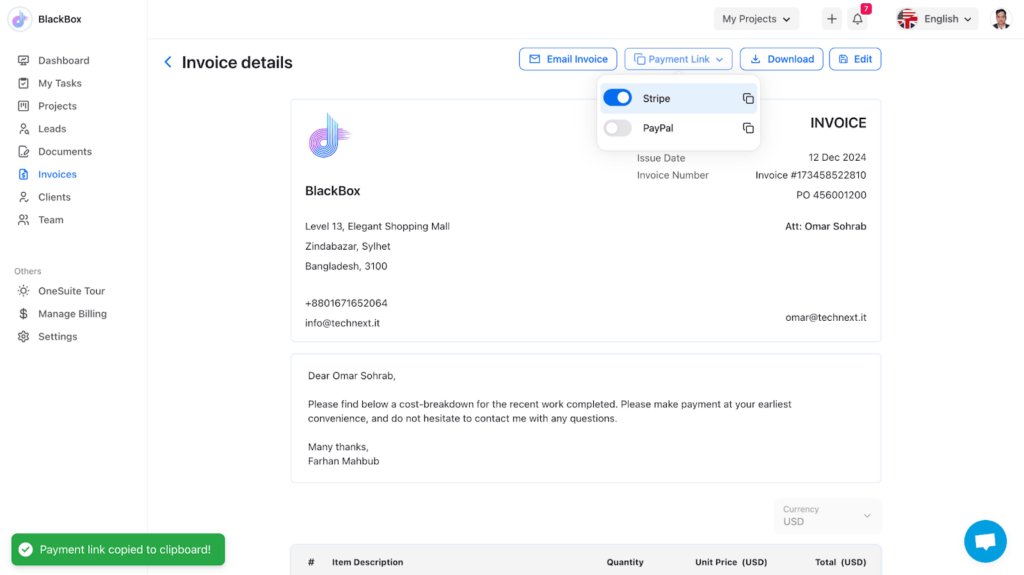
- Now, click to Payment Link
You will see a dropdown with your connected payment methods. For me, here I connected all of the options.
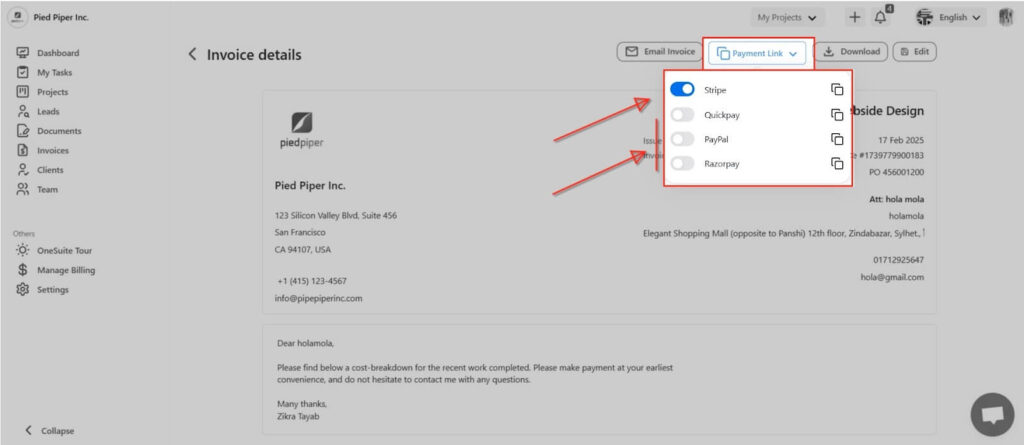
- Uncheck the other payment methods and keep checking your selected one.
And that’s it—you’re all set!
6. Review and Send the Invoice
Now let your client know it’s now their turn to work on and pay you. Hola!
But how?
OneSuite allows you to bill your kind in many ways. Use the way that is most suitable for you.
Here, I mentioned each option.
- Client Portal: Invite your client to the portal so that your client can access the invoice and pay you directly from the client portal. Creating a client portal in OneSuite is a cup of tea.
- Email: You can bill your client through email. Click on Email Invoice before Payment Link and Confirm.
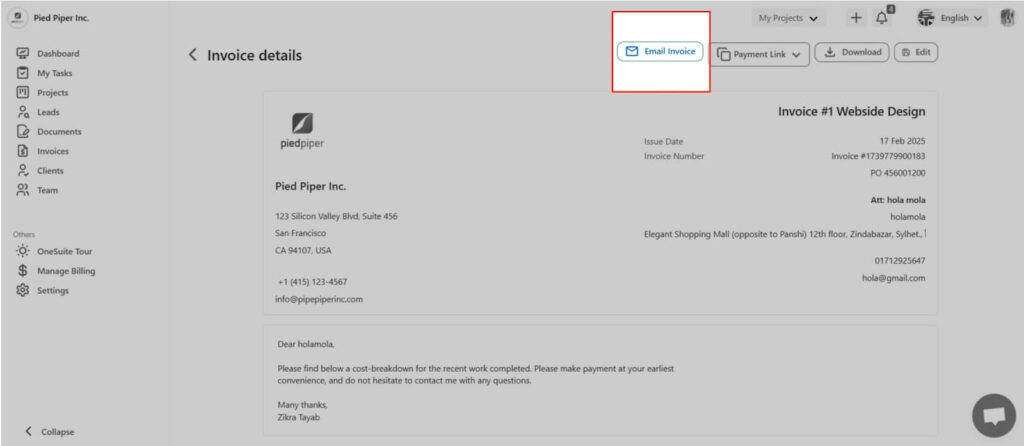
Your Client will receive an email with a download invoice link and a copy of the invoice in a PDF.
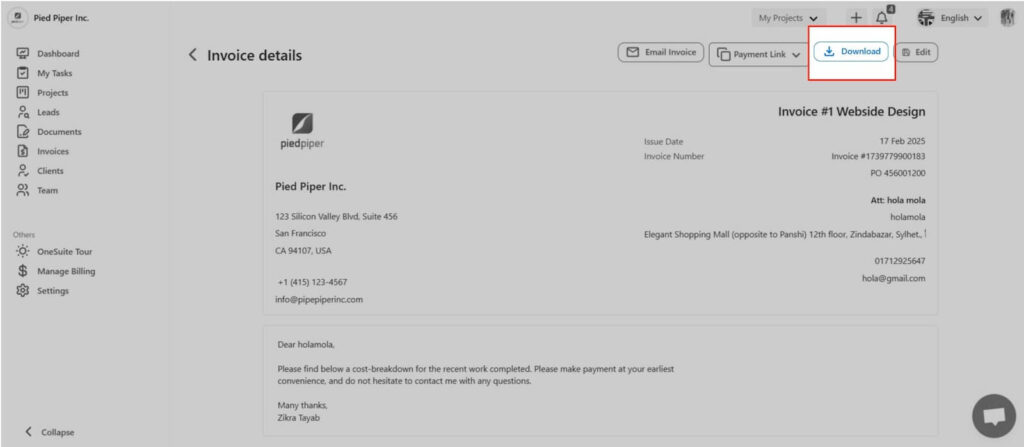
- Manually: You can even download the invoice and send the file manually where you do work.
- For this instance, copy the payment link from the Payment link and forward.
Happy Billing!
What are Some Common Client Billing Mistakes?
Even with a well-structured invoice, certain mistakes can delay payments or create confusion. Here I described some common errors to avoid:
- Errors in the Invoice – Typos, incorrect calculations, or missing details can lead to disputes and delays. Always double-check before sending.
- Not Following Up – Some clients may forget or overlook invoices. Sending gentle reminders ensures timely payments.
- Late Invoicing – Delays in sending invoices can lead to delays in getting paid. Always invoice as soon as the work is completed.
- Unclear Payment Terms – If your payment terms aren’t clear, clients may not know when or how to pay. Specify due dates, accepted payment methods, and late fees.
- Missing Invoice Information – An invoice without essential details like your business name, client details, invoice number, and itemized charges can confuse you. Ensure all required fields are filled.
5 Invoicing Templates and Examples
Visuals are very important for branding and building trust with clients. A well-branded invoice makes a strong impression, reinforcing professionalism. That’s why upgrading your invoice template is essential.
Here, I list 5 best in my eyes invoicing templates and examples that you can try.
1. OneSuite Invoice
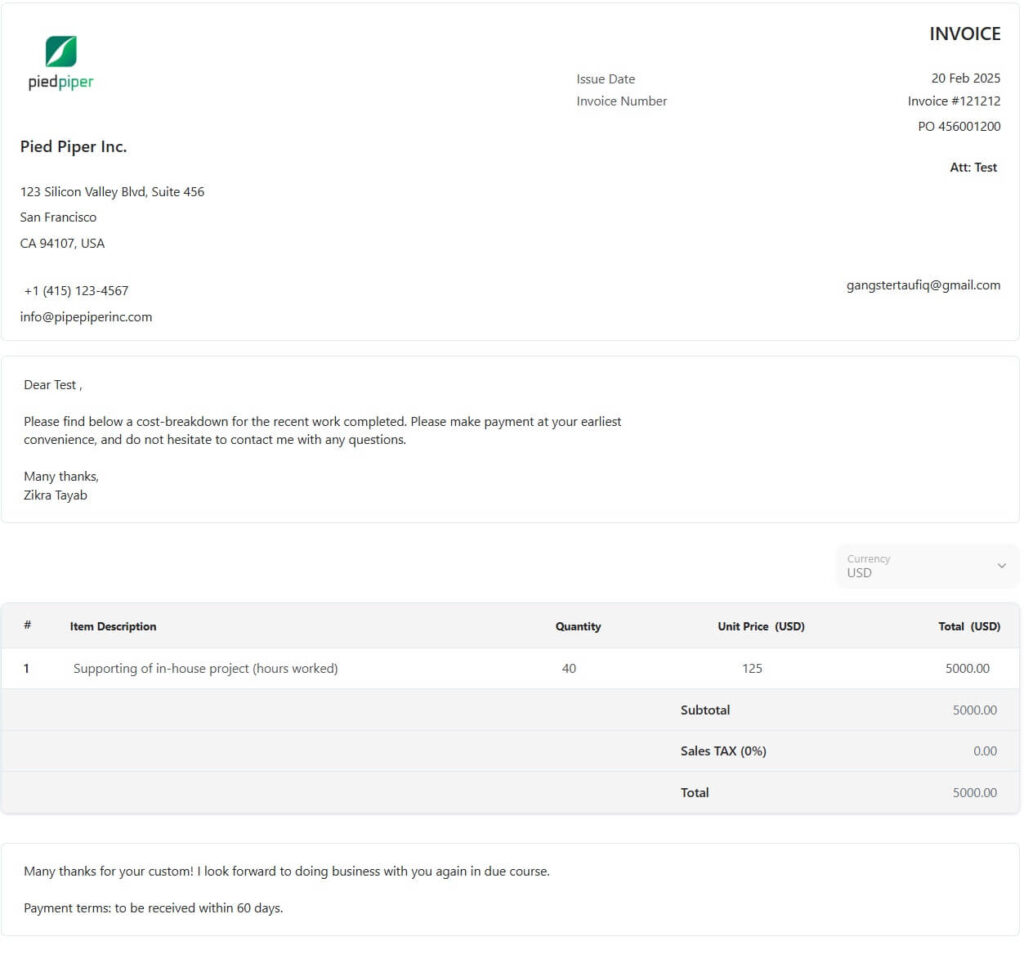
The OneSuite default invoice is clear, professional, and easy to understand. It includes company and client details, an itemized breakdown of services, the total amount due, and payment terms for transparency.
A polite closing message adds a professional touch. However, minor formatting inconsistencies could be improved for better readability.
Note: OneSuite is working on bringing you a gallery of invoice templates.
2. Google Invoice
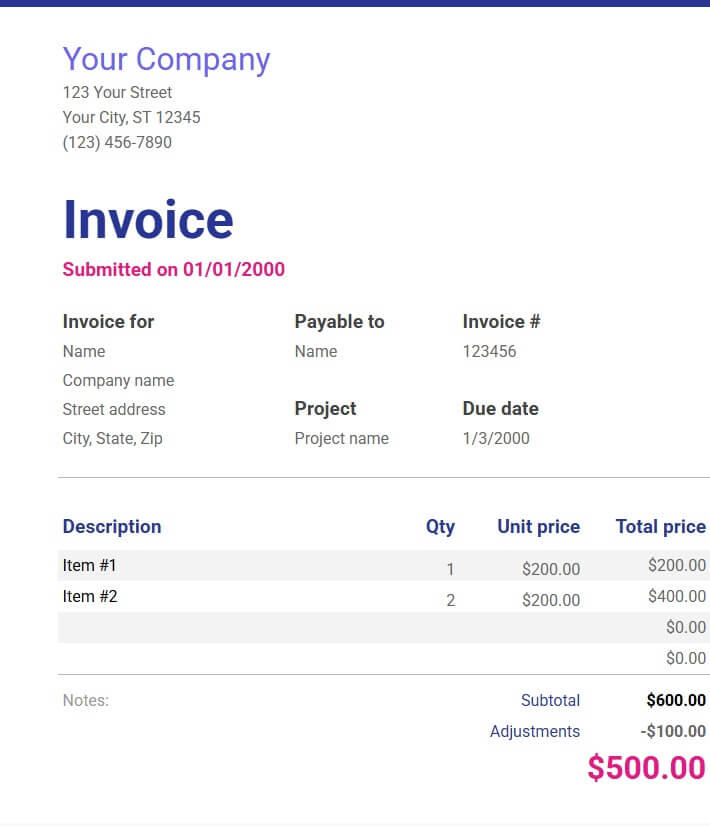
This Google Spreadsheet invoice is clean and structured, displaying details like company information, invoice number, due date, and project name.
The itemized section lists descriptions, quantities, unit prices, and total costs, with subtotal and adjustments shown separately. The bold, colored total ensures visibility.
3. Canva Invoice
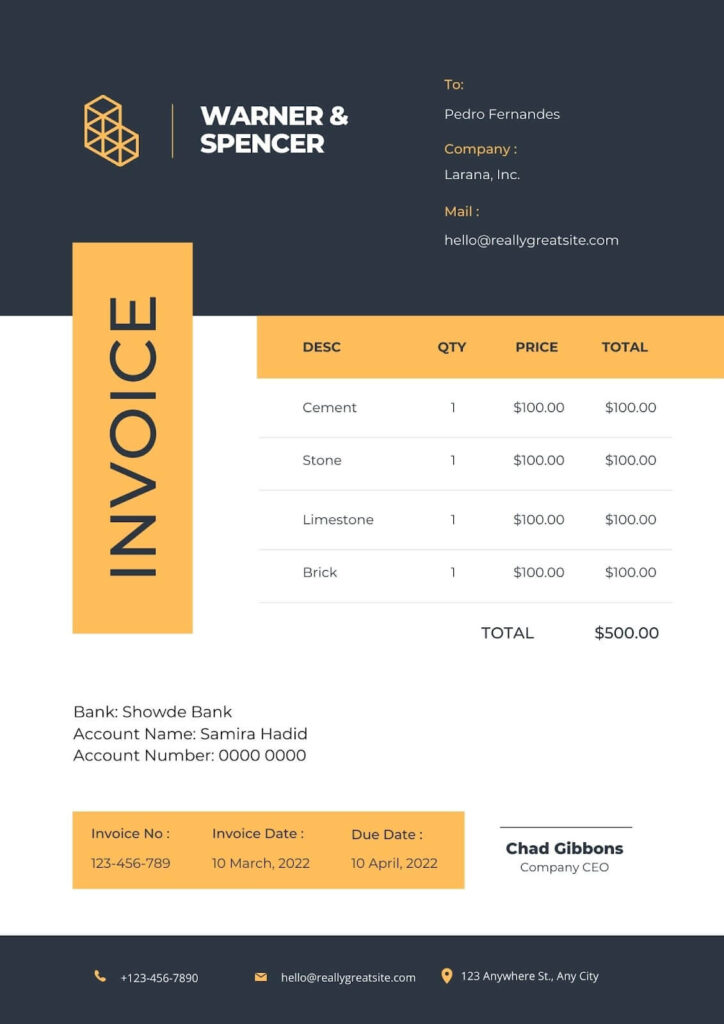
This Canva invoice template is modern and well-structured, featuring a bold design with clear sections for company details, recipient information, and payment terms. However, minor improvements, such as more space between elements, could enhance readability.
Canva offers more invoice templates for users to explore and get ideas.
FAQs on How to Bill a Client For the First Time
What is Client Billing?
Client billing is invoicing a client for products or services provided, ensuring proper payment tracking.
What are the Essential Elements of an Invoice?
The essential elements of an invoice are,
– Your business details,
– client information,
– invoice number,
– date,
– itemized services,
– total amount,
– payment terms, and
– due date.
Should You Bill a Client Before Service?
It depends on the agreement. Some businesses require upfront payment, while others bill after service completion.
What is the Best Invoicing Software?
Popular options include OneSuite, QuickBooks, FreshBooks, and Wave, offering automated invoicing and tracking features.
What are the Importances of Client Billing?
Proper billing ensures timely payments, maintains cash flow, keeps records organized, and builds client trust.
What are the Client Billing Best Practices for the First Time?
Set clear terms, use professional invoices, specify due dates, follow up on payments, and offer multiple payment options.
Can I Charge Interest on Unpaid Invoices?
Yes, if stated in your payment terms. Late fees encourage timely payments and compensate for delays.
Conclusion
Now that you know how to bill a client for the first time, the process should feel much more manageable. With a clear invoicing system, accurate details, and timely follow-ups, you can ensure smooth payments and maintain a professional-client relationship.
Want to streamline your billing process? Try OneSuite today and make invoicing effortless!
Find a Better Way to Grow
OneSuite streamlines projects, clients, and payments in one place, making growth hassle-free.


